Authentication is a critical aspect of building secure applications. It protects user data and ensures that only authorized users can access your services. One of the most privacy-conscious authentication methods available today is Sign in with Apple. With its built-in security features and minimal data-sharing approach, it has become a popular choice for developers looking to integrate seamless authentication.
In this guide, we'll walk through the full process of implementing Sign in with Apple using Appwrite, a backend server for building secure, scalable applications. We'll cover everything from configuring Appwrite for OAuth2 authentication to setting up your Apple Developer account, followed by examples for various platforms like web, Android, iOS, and Flutter.
By the end of this guide, you'll have a complete understanding of how to integrate Apple Sign-In into your application.
Understanding OAuth2 and how Appwrite handles authentication
Before jumping into the implementation, it's important to understand the basics of OAuth2. OAuth2 is an open standard for authorization that allows third-party services to grant limited access to user accounts without exposing passwords. This makes it ideal for integrating with platforms like Apple, Google, and Facebook.
In an OAuth2 flow, users are redirected to the authentication provider (in this case, Apple), where they authorize your application. The provider then returns a token that your backend can use to authenticate the user. Appwrite simplifies this process by managing the entire OAuth2 flow, including token handling and session management, so you can focus on the user experience.
Appwrite's built-in support for OAuth2 allows you to enable various third-party login providers quickly, including Sign in with Apple. With a few configuration steps, you can leverage OAuth2 for secure, privacy-first authentication.
Step 1: Set up your Appwrite project
1.1 Creating a new Appwrite project
To start, you'll need to create a new project in your Appwrite instance. This project will manage your app's users, authentication, databases, and more.
Log in to the Appwrite console: Access your Appwrite console at cloud.appwrite.io.
Create a new project: In the dashboard, click Create Project, enter a name for your project, and click Create.
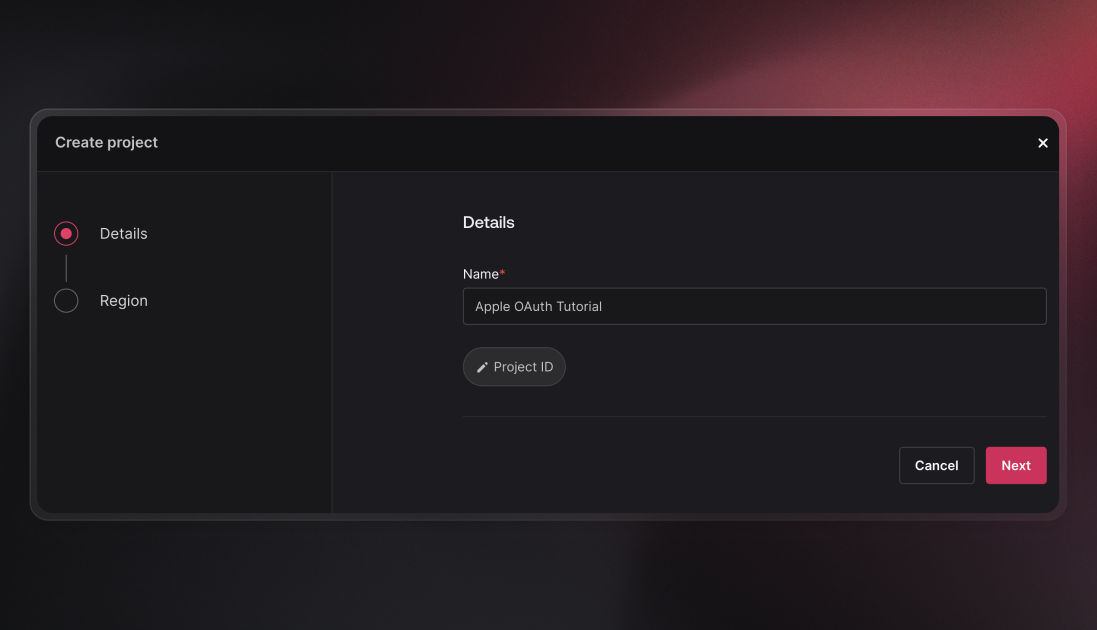
Once the project is created, you'll be taken to the project dashboard. Here, you can monitor usage and configure settings for your project.
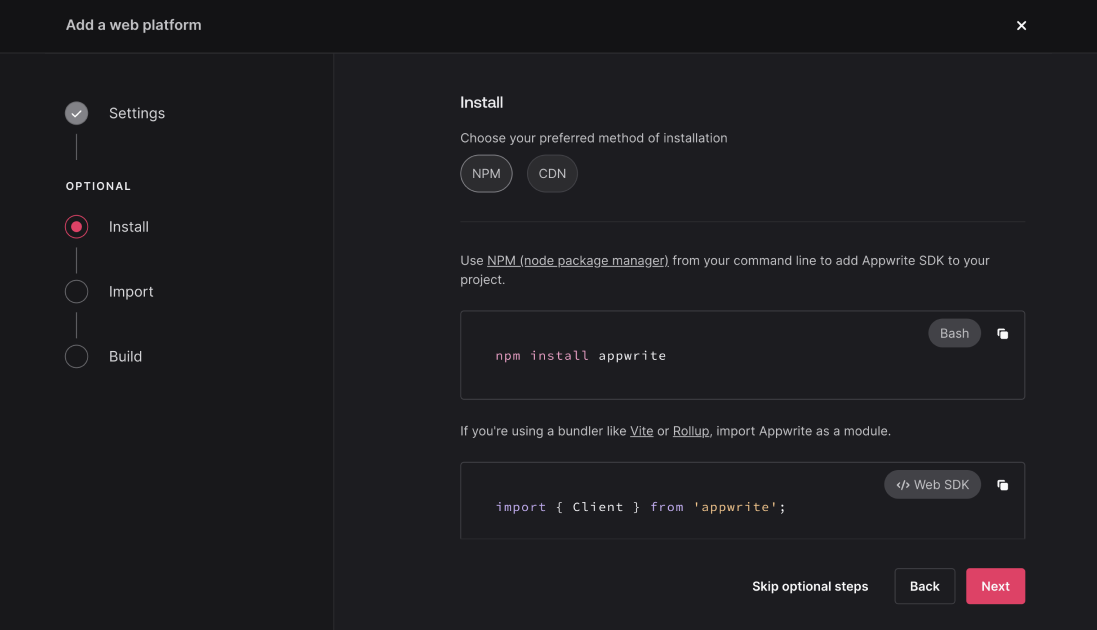
1.2 Adding a platform to your project
Each platform (web, Android, iOS) that interacts with your Appwrite project needs to be registered. This ensures that only authorized platforms can access Appwrite's APIs.
In the project dashboard, navigate to the Overview tab, and in the Add a platform section, select your platform type (Web, iOS, Android).
For Web:
Choose the Web option.
Enter a platform name (e.g., "WebApp") and the hostname of your app (e.g., example.com).
After registering the platform, Appwrite will provide a code snippet for initializing the SDK. You'll use this later to integrate the Appwrite SDK into your project.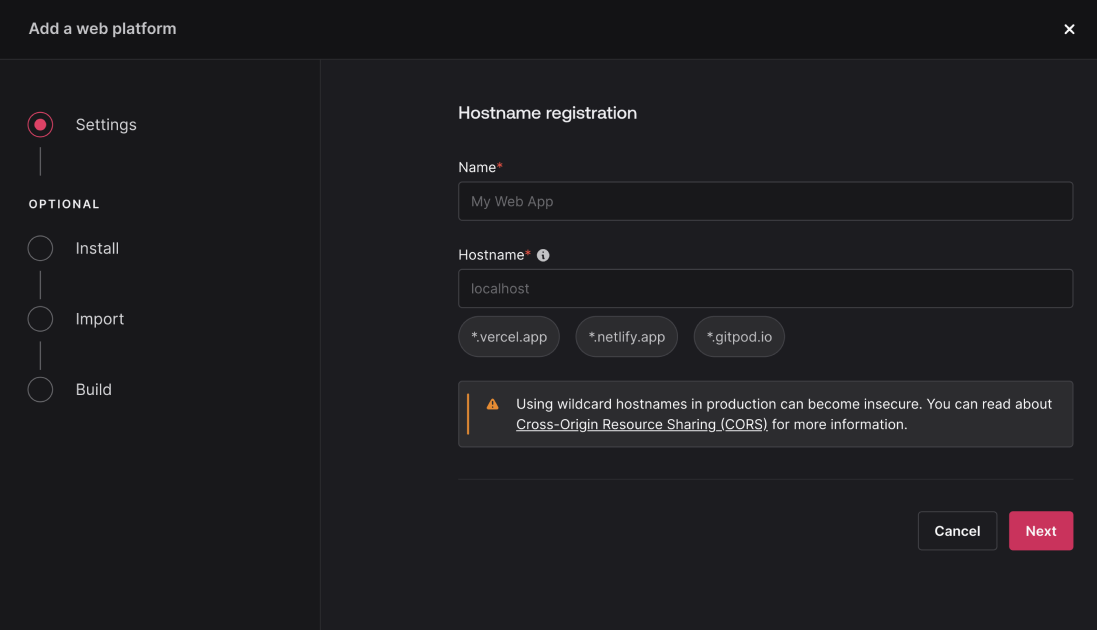
For Mobile:
Select iOS or Android depending on your platform.
Enter the required information such as Bundle ID for iOS or Package Name for Android.
With this setup, your Appwrite project is ready to handle authentication requests from your app.
Step 2: Configuring Appwrite for Apple Sign-In
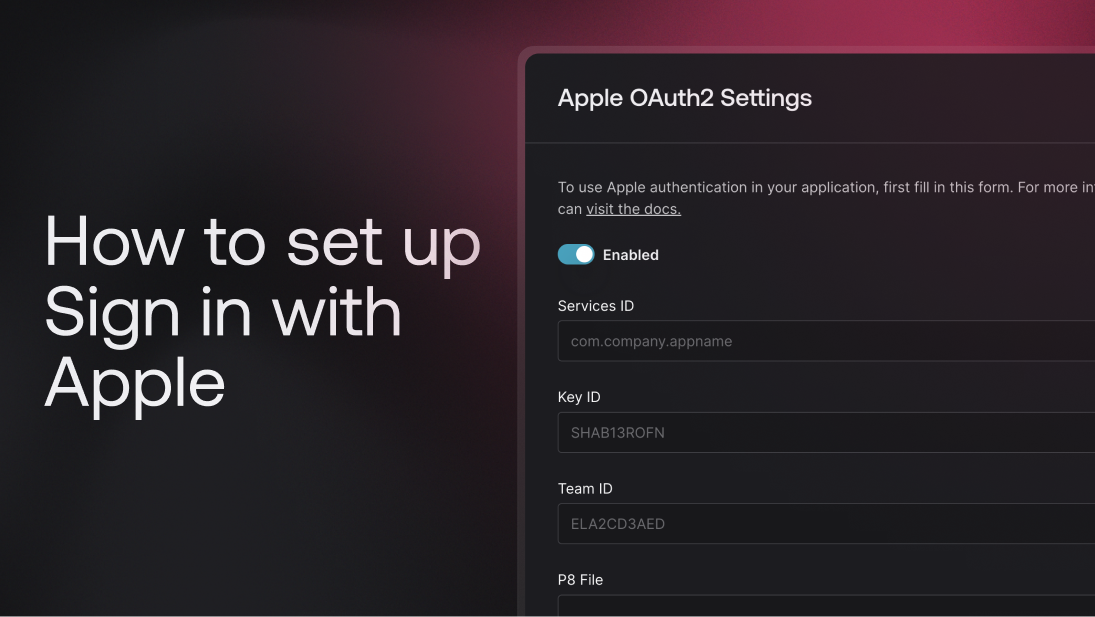
2.1 Enabling Apple OAuth2 in Appwrite
Now that your Appwrite project is ready, you can configure Appwrite to use Apple Sign-In.
In the Appwrite console, navigate to Auth > Settings.
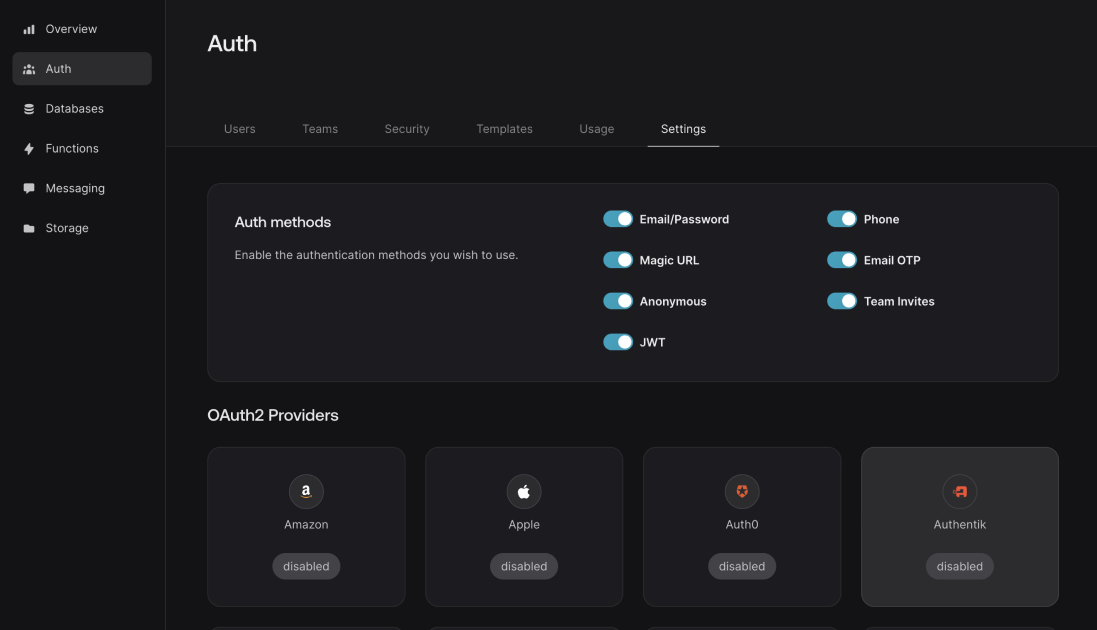
In the OAuth2 Providers section, click the Apple provider. This will return a modal with a toggle button to enable Apple authentication.
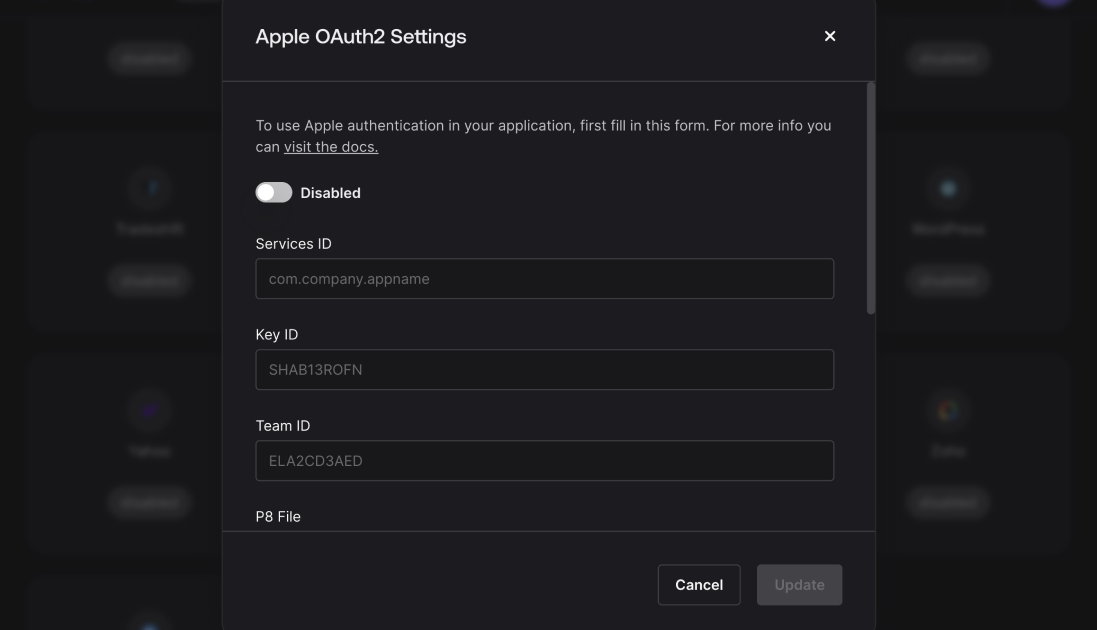
2.2 Providing Apple credentials in Appwrite
Once enabled, you'll need to fill in the following fields:
Services ID: The Service ID you will create later in your Apple Developer account.
Key ID: The ID of the authentication key you will create later in your Apple Developer account.
Team ID: The Team ID from your Apple Developer account (you'll obtain this in the next steps).
P8 File: In the next step, you'll generate an authentication key from Apple, which will be downloaded as a .p8 file. Open the .p8 file in a text editor, copy its contents, and paste them into the P8 File field.
These settings allow Appwrite to communicate securely with Apple's servers for authentication. Before we proceed, let's configure your Apple Developer account.
Step 3: Configuring your Apple Developer account
To enable Sign in with Apple, you'll need to configure several settings in the Apple Developer Console.
3.1 Setting up your Apple Developer account
Log in to the Apple Developer website using your Apple ID. Once logged in:
Navigate to Account > Membership and note down your Team ID. This will be required for Appwrite's OAuth2 configuration.
3.2 Registering an App ID
An App ID is required for every app that uses Apple's services, including authentication.
Go to Certificates, Identifiers & Profiles > Identifiers.
Click the plus icon (+) beside Identifiers to create a new identifier, then select App IDs.
Provide a Description and a unique Bundle ID (e.g., com.example.myapp).
Under Capabilities, enable Sign in with Apple.
Review the settings and click Register.
3.3 Creating a Service ID for web authentication
If you're building a web app, you'll need to create a Service ID to handle Apple Sign-In.
In the Identifiers section, click the plus icon (+) and select Service IDs.
Provide a Description and a unique Identifier (e.g., com.example.myapp.web).
Click Register to create the Service ID.
With your service ID created, you can configure it for Sign in with Apple. To do this:
Click on the Service ID you created.
Beside Sign in with Apple, tick the checkbox to enable it.
Click Configure to set up the service.
Select the Primary App ID you created earlier.
Under Register Website URLs, enter the domain of your web app and the Return URI you got from Appwrite earlier.
Click Save to apply the changes.
This Service ID allows users to authenticate with Apple via your web application.
3.4 Generating an Apple authentication key
To securely communicate with Apple's servers, you need to generate an authentication key.
Go to Keys and click Create a Key.
Set a Key Name (e.g., "Apple Sign-In Key").
Enable Sign in with Apple and click Configure.
Select the App ID you created earlier.
After saving the key, click Register and a new page will display the key details.
Click Download to save the key as a .p8 file.
Important: Store the .p8 file securely, as it can only be downloaded once.
With these configurations, you can now go back to Appwrite and fill in the Apple credentials as described in Step 2.
Step 4: Implementing sign in with Apple in your project
With your Apple Developer credentials and Appwrite OAuth2 settings configured, it's time to implement Sign in with Apple in your app. We'll walk through this step-by-step for each platform.
4.1 Understanding the OAuth2 flow with Appwrite
Before diving into platform-specific code, let's break down the OAuth2 flow in Appwrite. Here's how the process works:
Initialization: Your app uses Appwrite's SDK to initiate an OAuth2 session by redirecting the user to Apple's login page.
Authentication: The user authenticates with their Apple ID credentials on Apple's login page.
Token exchange: Once authenticated, Apple redirects the user back to your app with an authorization code.
Session creation: Appwrite exchanges the authorization code for an access token from Apple, creates a session for the user, and returns the user to your app with the session.
Session management: After login, your app can use Appwrite's Account API to manage the user's session, check login status, and handle logouts.
Now, let's move on to platform-specific implementations.
4.2 Implementing in a web application
For web applications, you will use the Appwrite SDK to initiate the OAuth2 flow and handle authentication. Here's how you can integrate Sign in with Apple into your web app:
1. Install the Appwrite SDK: First, make sure the Appwrite JavaScript SDK is installed in your project:
npm install appwrite
2. Initialize the SDK: Place the following code in your project where the Appwrite SDK should be initialized, such as in the main application file (index.js or similar):
import { Appwrite } from 'appwrite'

const appwrite = new Appwrite()

appwrite
  .setEndpoint('https://YOUR_ENDPOINT')// Your API Endpoint
  .setProject('YOUR_PROJECT_ID')// Your project ID
3. Create the OAuth2 session: When a user clicks the "Sign in with Apple" button, trigger the following function to create an OAuth2 session:
async function loginWithApple() {
  try {
    await appwrite.account.createOAuth2Session(
      'apple',
      'https://YOUR_ENDPOINT/auth/oauth2/success',
      'https://YOUR_ENDPOINT/auth/oauth2/failure',
    )
  } catch (error) {
    console.error('Error logging in with Apple:', error)
  }
}
The redirect URLs should correspond to the success and failure URLs you configured in your Apple Developer account and Appwrite settings. On a successful login, the user is redirected to the success URL, and on failure (e.g., user cancels login), the user is sent to the failure URL.
4. Session handling: After a successful login, Appwrite creates a session for the user. You can use Appwrite's session management API to check the user's login status:
const session = await appwrite.account.getSession('current')
console.log('User session:', session)
This helps you manage authenticated states in your application.
5. Error handling: If login fails (due to network issues, user cancellation, etc.), handle the error gracefully. For example:
if (error.message === 'OAuth2Error') {
  alert('Login failed. Please try again.')
}
6. Logout: Provide an option to log out the user by terminating the session:
await appwrite.account.deleteSession('current')
4.3 Implementing in a Flutter application
For Flutter applications, Appwrite provides an SDK that allows you to manage authentication seamlessly. Here's how to integrate Sign in with Apple into your Flutter app:
1. Add the Appwrite SDK to your project: Learn how to do this here.
2. Initialize the Appwrite client: Initialize the SDK in your app's main.dart file or wherever you handle authentication logic:
import 'package:appwrite/appwrite.dart';

void main() {
  Client client = Client();

  client
    .setEndpoint('https://YOUR_ENDPOINT')// Your API Endpoint
    .setProject('YOUR_PROJECT_ID');// Your project ID
}
3. Initiate the OAuth2 flow: When the user taps the "Sign in with Apple" button, start the authentication process:
final account = Account(client);

Future<void> loginWithApple() async {
  try {
    await account.createOAuth2Session(
      provider: 'apple',
      success: 'https://YOUR_ENDPOINT/auth/oauth2/success',
      failure: 'https://YOUR_ENDPOINT/auth/oauth2/failure',
    );
  } catch (error) {
    print('Error logging in with Apple: $error');
  }
}
4. Check session status: After login, you can check the current session to see if the user is authenticated:
final session = await account.getSession(sessionId: 'current');
print('Current session: $session');
5. Handle errors: Just like on the web, handle possible errors during the OAuth2 flow. You could display an error message or provide retry logic:
if (error.toString().contains('OAuth2Error')) {
  showError('Login failed. Please try again.');
}
6. Logout: To log the user out, delete the current session:
await account.deleteSession(sessionId: 'current');
4.4 Implementing in Android
Android requires special handling to manage the lifecycle of activities during OAuth2 authentication. Here's how to implement Sign in with Apple on Android:
1. Add the Appwrite SDK: Learn how to add the Appwrite SDK to your Android project here.
2. Initialize the SDK in your MainActivity:
import io.appwrite.Client
import io.appwrite.services.Account

class MainActivity : AppCompatActivity() {
    override fun onCreate(savedInstanceState: Bundle?) {
        super.onCreate(savedInstanceState)
        setContentView(R.layout.activity_main)

        val client = Client(applicationContext)
            .setEndpoint("https://YOUR_ENDPOINT")
            .setProject("YOUR_PROJECT_ID")
    }
}
3. Start the OAuth2 flow: Trigger the OAuth2 flow when the user interacts with the "Sign in with Apple" button:
val account = Account(client)

GlobalScope.launch {
    try {
        account.createOAuth2Session(
            activity = this@MainActivity,
            provider = "apple"
        )
    } catch (e: Exception) {
        Log.e("SignInError", "Error logging in with Apple", e)
    }
}
4. Handle redirects: Ensure that your app's redirect URL matches the one configured in the Apple Developer console. 5. Error handling: Manage errors such as failed authentication attempts or network issues in the callback:
Log.e("OAuthError", "Login failed: ${e.message}")
4.5 Implementing in iOS (Swift)
For iOS apps, integrating Sign in with Apple using Appwrite involves configuring the SDK and managing OAuth2 redirects.
1. Install the Appwrite SDK: Learn how to add the Appwrite SDK to your iOS project here 2. Initialize the SDK in your AppDelegate:
import Appwrite

let client = Client()
    .setEndpoint("https://YOUR_ENDPOINT")
    .setProject("YOUR_PROJECT_ID")
3. Trigger the OAuth2 flow: In your view controller, start the OAuth2 flow when the user taps the "Sign in with Apple" button:
let account = Account(client)

account.createOAuth2Session(
    provider: "apple",
    success: "https://YOUR_ENDPOINT/auth/oauth2/success",
    failure: "https://YOUR_ENDPOINT/auth/oauth2/failure"
) { result in
    switch result {
    case .failure(let error):
        print("Error logging in: \(error.localizedDescription)")
    case .success:
        print("Login successful")
    }
}
5. Handle error states: Manage error states when the login fails:
case .failure(let error):
    showAlert("Login failed: \(error.localizedDescription)")
4.6 Token management and session handling
After a successful OAuth2 session, the user's session is stored by Appwrite, and you can access it via the SDK to maintain login states across your app. It's important to handle session management, especially in long-running applications:
Check active sessions
Use the following function to check if a user is still authenticated:
const session = await appwrite.account.getSession('current')
if (!session) {
  console.log('No active session. Redirecting to login...')
}
Handle token expiration
Be prepared for tokens to expire, and have logic to refresh tokens or redirect users to re-authenticate when necessary.
Logout users
Offer users the ability to logout and clear their session. For example, in web apps:
await appwrite.account.deleteSession('current')
By following these steps, you can implement Sign in with Apple using Appwrite across various platforms. Each platform requires slightly different handling for OAuth2 flows, session management, and error handling, but the core process remains the same: redirect the user to Apple for authentication, manage the session through Appwrite, and handle errors and edge cases effectively. With proper integration, your app will offer secure and seamless authentication using Apple IDs, backed by Appwrite's OAuth2 platform.
Step 5: Testing your integration
Once you've integrated Sign in with Apple, it's time to test and troubleshoot. Here's how to approach it:
During testing, simulate various scenarios to ensure everything works as expected:
Test logging in with valid and invalid Apple IDs.
Simulate session expirations and token refresh flows.
Check the behavior across different platforms and devices to ensure consistency.
Conclusion
Integrating Sign in with Apple using Appwrite allows you to provide a secure and user-friendly authentication experience. With minimal configuration, you can utilize Appwrite's OAuth2 support to integrate third-party login systems across platforms. In this guide, we walked through the full setup process, including configuring Apple Developer credentials, setting up OAuth2 in Appwrite, and testing your integration across different platforms.
For more information on this, check out the Appwrite OAuth2 documentation and Apple's Sign in with Apple documentation.
More resources: