Execution_
Understand serverless function execution in Appwrite. Explore how triggers, events, and data flow enable dynamic execution of your code.
7 min read
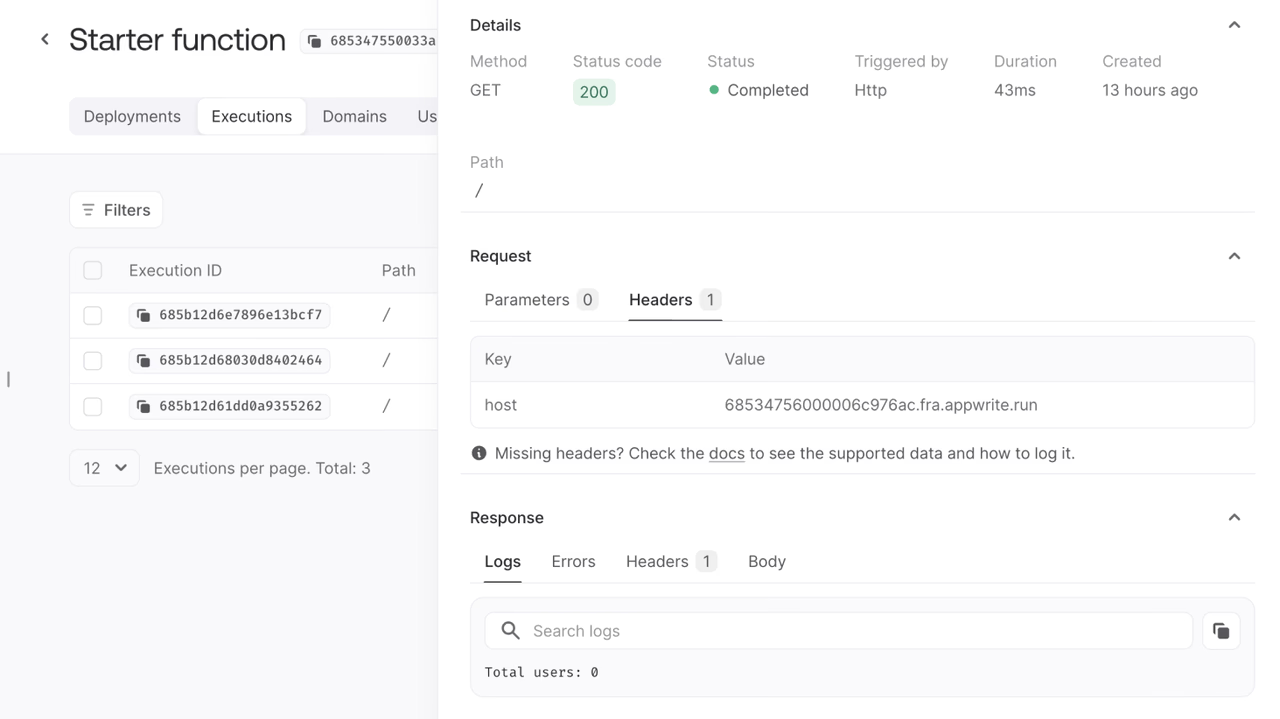
Appwrite Functions can be executed in several ways. Executions can be invoked through the Appwrite SDK and visiting its REST endpoint. Functions can also be triggered by events and scheduled executions. Here are all the different ways to consume your Appwrite Functions.
Execution modes
Appwrite Functions support two execution modes: synchronous and asynchronous.
Synchronous executions
Synchronous executions are those where Appwrite makes the request to the function runtime synchronously and waits for the response. The client making the request will wait until the function completes and receives the response directly.
Synchronous executions are created via:
- The Create execution endpoint where the
asyncparameter isfalse - Requests to custom or auto-generated domains
Synchronous executions:
- Return response bodies and headers directly to the client
- Have a 30-second hard timeout limit to discourage slow API calls that cause poor user experience in apps
- Are ideal for short-running operations where you need response data quickly
Asynchronous executions
Asynchronous executions are added to a queue and processed by the function worker as background jobs.
Asynchronous executions are created via:
- The Create execution endpoint where the
asyncparameter istrue - Event triggers (when functions are triggered by platform events)
- Scheduled executions (intervals, cron jobs, or delayed executions)
Asynchronous executions:
- Have no timeout limitations beyond your function's configured timeout
- Are ideal for background processing and event-driven workflows
Response bodies and headers are not stored anywhere, so they are only ever returned via synchronous executions.
Domains
You can execute a function through HTTP requests, using a browser or by sending an HTTP request.
- In the Appwrite Console's sidebar, click Functions.
- Under Execute access, set the access to
Anyso that anyone can execute the function. You will use JWTs to authenticate users. - Under the Domains tab, you'll find the generated domain from Appwrite and your custom domains. Learn about adding a custom domain.
https://64d4d22db370ae41a32e.fra.appwrite.runWhen requests are made to this domain, whether through a browser or through an HTTP request, the request information like request URL, request headers, and request body will be passed to the function.
curl -X POST https://64d4d22db370ae41a32e.fra.appwrite.run \-H "X-Custom-Header: 123" \-H "x-appwrite-user-jwt: <YOUR_JWT_KEY>" \-H "Content-Type: application/json" \-d '{"data":"this is json data"}'Notice how a x-appwrite-user-jwt header is passed in the request, you will use this to authenticate users. Learn more about JWTs.
This unlocks the ability for you to develop custom HTTP endpoints with Appwrite Functions. It also allows accepting incoming webhooks for handling online payments, hosting social platform bots, and much more.
SDK
You can invoke your Appwrite Functions directly from the Appwrite SDKs.
import { Client, Functions } from "appwrite";
const client = new Client();
const functions = new Functions(client);
client    .setEndpoint('https://<REGION>.cloud.appwrite.io/v1') // Your API Endpoint    .setProject('<PROJECT_ID>') // Your project ID;
const promise = functions.createExecution({    functionId: '<FUNCTION_ID>',    body: '<BODY>',  // optional    async: false,  // optional    xpath: '<PATH>',  // optional    method: 'GET',  // optional    headers: {} // optional});
promise.then(function (response) { console.log(response); // Success}, function (error) { console.log(error); // Failure});const sdk = require('node-appwrite');
// Init SDKconst client = new sdk.Client();
const functions = new sdk.Functions(client);
client .setEndpoint('https://<REGION>.cloud.appwrite.io/v1') // Your API Endpoint .setProject('<PROJECT_ID>') // Your project ID;
const promise = functions.createExecution({ functionId: '<FUNCTION_ID>', body: '<BODY>', // optional async: false, // optional xpath: '<PATH>', // optional method: sdk.ExecutionMethod.GET, // optional headers: {} // optional});
promise.then(function (response) { console.log(response); // Success}, function (error) { console.log(error); // Failure});Console
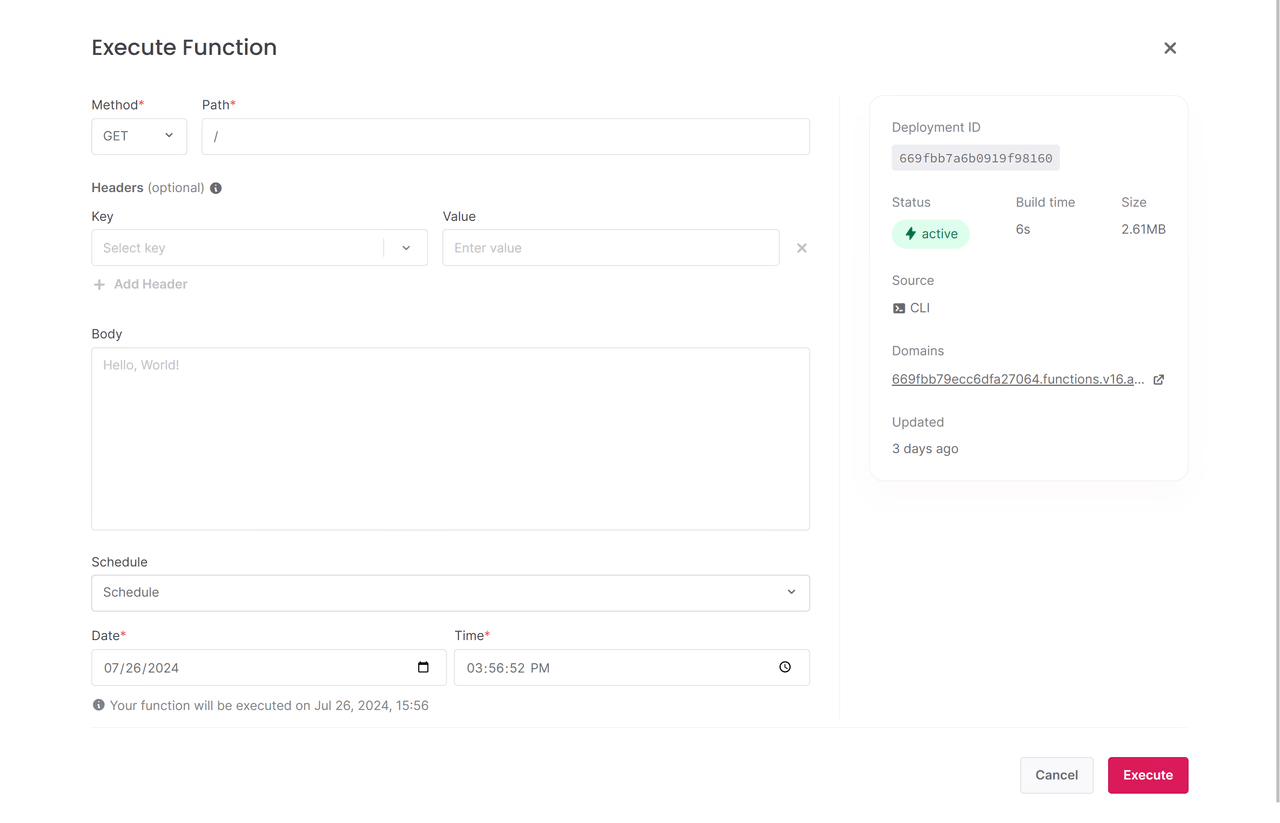
Another easy way to test a function is directly in the Appwrite Console. You test a function by hitting the Execute now button, which will display a modal below.
You'll be able to mock executions by configuring the path, method, headers, and body.
Events
Changes in Appwrite emit events. You can configure Functions to be executed in response to these events.
- In Appwrite Console, navigate to Functions.
- Click to open a function you wish to configure.
- Under the Settings tab, navigate to Events.
- Add one or multiple events as triggers for the function.
- Be careful to avoid selecting events that can be caused by the function itself. This can cause the function to trigger its own execution, resulting in infinite recursions.
In these executions, the event that triggered the function will be passed as the header x-appwrite-event to the function. The request.body parameter will contain the event data. Learn more about events.
You can use one of the following events.
| Name | Description |
|---|---|
teams.* | This event triggers on any teams event. Returns Team Object |
teams.*.create | This event triggers when a team is created. Returns Team Object |
teams.*.delete | This event triggers when a team is deleted. Returns Team Object |
teams.*.memberships.* | This event triggers on any team memberships event. Returns Membership Object |
teams.*.memberships.*.create | This event triggers when a membership is created. Returns Membership Object |
teams.*.memberships.*.delete | This event triggers when a membership is deleted. Returns Membership Object |
teams.*.memberships.*.update | This event triggers when a membership is updated. Returns Membership Object |
teams.*.memberships.*.update.status | This event triggers when a team memberships status is updated. Returns Membership Object |
teams.*.update | This event triggers when a team is updated. Returns Team Object |
teams.*.update.prefs | This event triggers when a team's preferences are updated. Returns Team Object |
users.* | This event triggers on any user's event. Returns User Object |
users.*.create | This event triggers when a user is created. Returns User Object |
users.*.delete | This event triggers when a user is deleted. Returns User Object |
users.*.recovery.* | This event triggers on any user's recovery token event. Returns Token Object |
users.*.recovery.*.create | This event triggers when a recovery token for a user is created. Returns Token Object |
users.*.recovery.*.update | This event triggers when a recovery token for a user is validated. Returns Token Object |
users.*.sessions.* | This event triggers on any user's sessions event. Returns Session Object |
users.*.sessions.*.create | This event triggers when a session for a user is created. Returns Session Object |
users.*.sessions.*.delete | This event triggers when a session for a user is deleted. Returns Session Object |
users.*.update | This event triggers when a user is updated. Returns User Object |
users.*.update.email | This event triggers when a user's email address is updated. Returns User Object |
users.*.update.name | This event triggers when a user's name is updated. Returns User Object |
users.*.update.password | This event triggers when a user's password is updated. Returns User Object |
users.*.update.prefs | This event triggers when a user's preferences is updated. Returns User Object |
users.*.update.status | This event triggers when a user's status is updated. Returns User Object |
users.*.verification.* | This event triggers on any user's verification token event. Returns Token Object |
users.*.verification.*.create | This event triggers when a verification token for a user is created. Returns Token Object |
users.*.verification.*.update | This event triggers when a verification token for a user is validated. Returns Token Object |
| Name | Description |
|---|---|
tablesdb.* | This event triggers on any database event. Returns Database Object |
tablesdb.*.tables.* | This event triggers on any table event. Returns Table Object |
tablesdb.*.tables.*.columns.* | This event triggers on any columns event. Returns Column Object |
tablesdb.*.tables.*.columns.*.create | This event triggers when a column is created. Returns Column Object |
tablesdb.*.tables.*.columns.*.update | This event triggers when a column is updated. Returns Column Object |
tablesdb.*.tables.*.columns.*.delete | This event triggers when a column is deleted. Returns Column Object |
tablesdb.*.tables.*.create | This event triggers when a table is created. Returns Table Object |
tablesdb.*.tables.*.delete | This event triggers when a table is deleted. Returns Table Object |
tablesdb.*.tables.*.rows.* | This event triggers on any rows event. Returns Row Object |
tablesdb.*.tables.*.rows.*.create | This event triggers when a row is created. Returns Row Object |
tablesdb.*.tables.*.rows.*.delete | This event triggers when a row is deleted. Returns Row Object |
tablesdb.*.tables.*.rows.*.update | This event triggers when a row is updated. Returns Row Object |
tablesdb.*.tables.*.rows.*.upsert | This event triggers when a row is upserted. Returns Row Object |
tablesdb.*.tables.*.indexes.* | This event triggers on any indexes event. Returns Index Object |
tablesdb.*.tables.*.indexes.*.create | This event triggers when an index is created. Returns Index Object |
tablesdb.*.tables.*.indexes.*.update | This event triggers when an index is updated. Returns Index Object |
tablesdb.*.tables.*.indexes.*.delete | This event triggers when an index is deleted. Returns Index Object |
tablesdb.*.tables.*.update | This event triggers when a table is updated. Returns Table Object |
tablesdb.*.create | This event triggers when a database is created. Returns Database Object |
tablesdb.*.delete | This event triggers when a database is deleted. Returns Database Object |
tablesdb.*.update | This event triggers when a database is updated. Returns Database Object |
| Name | Description |
|---|---|
buckets.* | This event triggers on any buckets event. Returns Bucket Object |
buckets.*.create | This event triggers when a bucket is created. Returns Bucket Object |
buckets.*.delete | This event triggers when a bucket is deleted. Returns Bucket Object |
buckets.*.files.* | This event triggers on any files event. Returns File Object |
buckets.*.files.*.create | Since the Appwrite SDK chunks files in 5MB increments, this event will trigger for each 5MB chunk. A file is fully uploaded when chunksTotal equals chunksUploaded. Returns File Object |
buckets.*.files.*.delete | This event triggers when a file is deleted. Returns File Object |
buckets.*.files.*.update | This event triggers when a file is updated. Returns File Object |
buckets.*.update | This event triggers when a bucket is updated. Returns Bucket Object |
| Name | Description |
|---|---|
functions.* | This event triggers on any functions event. Returns Function Object |
functions.*.create | This event triggers when a function is created. Returns Function Object |
functions.*.delete | This event triggers when a function is deleted. Returns Function Object |
functions.*.deployments.* | This event triggers on any deployments event. Returns Deployment Object |
functions.*.deployments.*.create | This event triggers when a deployment is created. Returns Deployment Object |
functions.*.deployments.*.delete | This event triggers when a deployment is deleted. Returns Deployment Object |
functions.*.deployments.*.update | This event triggers when a deployment is updated. Returns Deployment Object |
functions.*.executions.* | This event triggers on any executions event. Returns Execution Object |
functions.*.executions.*.create | This event triggers when an execution is created. Returns Execution Object |
functions.*.executions.*.delete | This event triggers when an execution is deleted. Returns Execution Object |
functions.*.executions.*.update | This event triggers when an execution is updated. Returns Execution Object |
functions.*.update | This event triggers when a function is updated. Returns Function Object |
| Name | Description |
|---|---|
providers.* | This event triggers on any providers event. Returns Provider Object |
providers.*.create | This event triggers when a provider is created. Returns Provider Object |
providers.*.delete | This event triggers when a provider is deleted. Returns Provider Object |
providers.*.update | This event triggers when a provider is updated. Returns Provider Object |
topics.* | This event triggers on any topic event. Returns Topic Object |
topics.*.create | This event triggers when a topic is created. Returns Topic Object |
topics.*.delete | This event triggers when a topic is deleted. Returns Topic Object |
topics.*.update | This event triggers when a topic is updated. Returns Topic Object |
topics.*.subscribers.*.create | This event triggers when a subscriber to a topic is created. Returns Topic Object |
topics.*.subscribers.*.delete | This event triggers when a subscriber to a topic is deleted. Returns Topic Object |
messages.* | This event triggers on any message event. Returns Message Object |
messages.*.create | This event triggers when a message is created. Returns Message Object |
messages.*.delete | This event triggers when a message is deleted. Returns Message Object |
messages.*.update | This event triggers when a message is updated. Returns Message Object |
Schedule
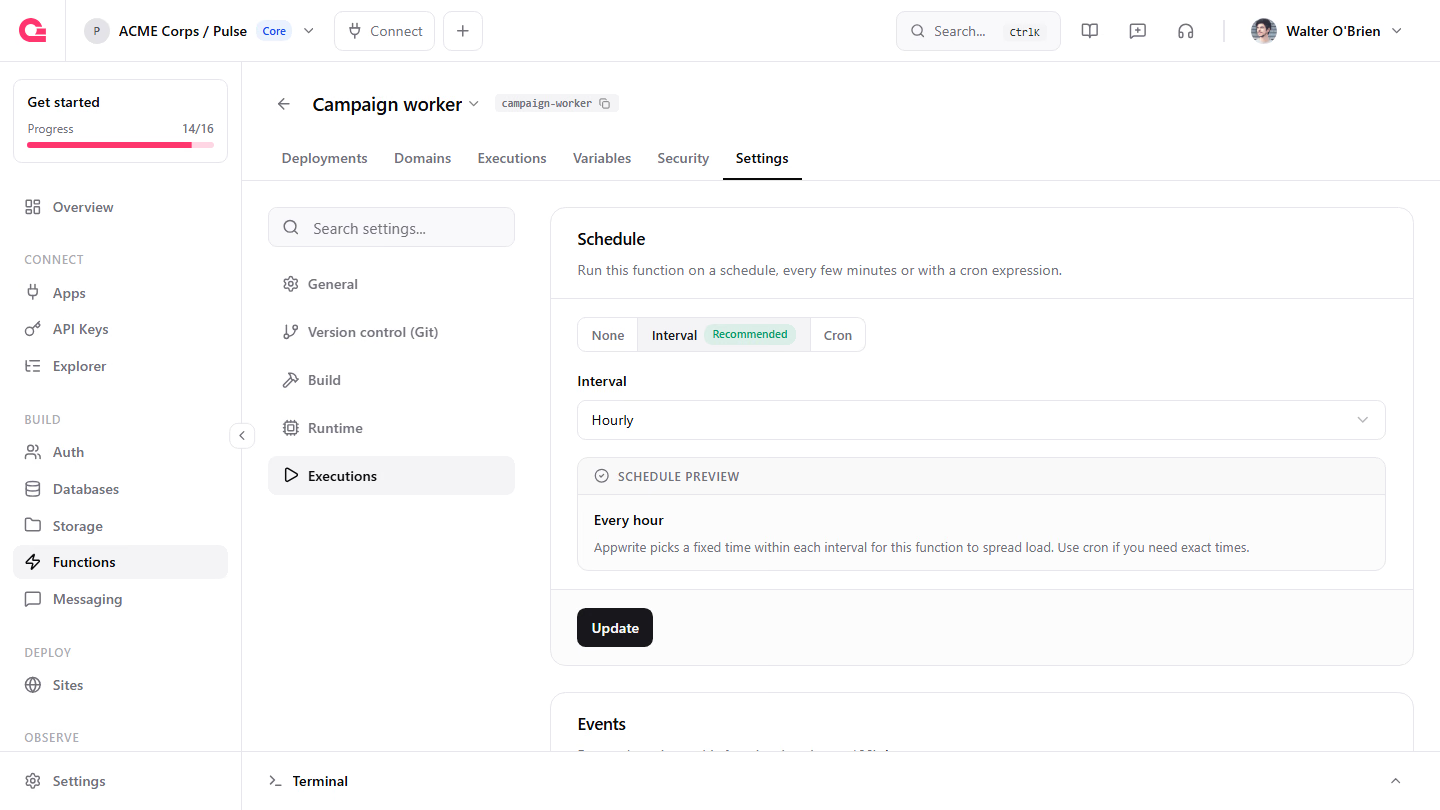
Appwrite supports recurring function executions. Set a schedule in the Appwrite Console under your function's Settings > Executions, or with a Server SDK using either the interval parameter (minutes) or the schedule parameter (a cron expression). A function uses one or the other, not both.
Interval
An interval runs your function every N minutes. Think of it as cron where Appwrite picks the time for you: an hourly interval runs at the same point in every hour, such as 37 minutes and 21 seconds past, chosen for your function.
every 60 minutes → 14:37:21, 15:37:21, 16:37:21, ...Each function gets its own time within the interval, so functions with the same interval don't all start at the same moment.
The interval is a whole number of minutes, as low as 1. On Appwrite Cloud, the Free and Education plans support intervals of 60 minutes or longer.
Run times are fixed to the UTC clock, not counted from when you save the function:
- The first run can be up to one full interval away. A daily interval may first run almost 24 hours after you set it.
- A daily interval (1440 minutes) runs at one fixed UTC time of day, which you can't choose. Use cron if the time of day matters.
- An interval that isn't a factor or multiple of 60, such as 45 or 90 minutes, doesn't run at the same time every hour.
- Changing the interval can move the time Appwrite picks.
To set an interval in the Appwrite Console, open your function and go to Settings > Executions. In the Schedule card, choose Interval, pick a preset or choose Custom to enter a number of minutes, hours or days, and click Update.
With a Server SDK, pass interval when you create or update a function:
const sdk = require('node-appwrite');
const client = new sdk.Client()    .setEndpoint('https://<REGION>.cloud.appwrite.io/v1') // Your API Endpoint    .setProject('<PROJECT_ID>') // Your project ID    .setKey('<API_KEY>'); // Your secret API key
const functions = new sdk.Functions(client);
// Run the function every 6 hoursawait functions.update({    functionId: '<FUNCTION_ID>',    name: '<NAME>', // name is required by update    interval: 360});
With the Appwrite CLI 28.3.0 or later, pass --interval:
appwrite functions update --function-id <FUNCTION_ID> --name <NAME> --interval 360To keep an interval in appwrite.config.json, set "interval" on the function and run appwrite push functions.
Set interval to 0 to stop running on an interval. An update that leaves out interval keeps the current one, but an update that leaves out schedule clears the cron expression, so pass schedule again whenever you update a function that uses cron.
Cron
A cron expression, set with the schedule parameter, runs your function at the times it describes, as frequently as every minute. Use cron when the time of day matters. On the Appwrite Cloud Free and Education plans, cron runs can start up to 5 minutes after the scheduled time.
Here are some cron expressions for common schedules:
| Cron Expression | Schedule |
|---|---|
*/15 * * * * | Every 15 minutes |
0 * * * * | Every Hour |
0 0 * * * | Every day at 00:00 |
0 0 * * 1 | Every Monday at 00:00 |
Setting a cron expression with the schedule parameter clears the function's interval.
Scheduled executions, from an interval or a cron expression, show schedule as their trigger in the execution logs.
Delayed executions
You can also delay function executions, which trigger the function only once at a future date and time. You can schedule a function execution using the Appwrite Console, a Client SDK, or a Server SDK.
To schedule an execution, navigate to Your function > Executions > Execute now > Schedule in the Appwrite Console.
You can also schedule your function executions using a supported Client SDK.
import { Client, Functions, ExecutionMethod } from "appwrite";
const client = new Client()    .setProject('<PROJECT_ID>'); // Your project ID
const functions = new Functions(client);
const result = await functions.createExecution({    functionId: '<FUNCTION_ID>',    body: '<BODY>', // optional    async: true, // Scheduled executions need to be async    xpath: '<PATH>', // optional    method: ExecutionMethod.GET, // optional    headers: {}, // optional    scheduledAt: '2020-10-15T06:38:00.000+00:00' // Schedule execution (optional)});
console.log(result);
You can also schedule your function executions using a supported Server SDK.
const sdk = require('node-appwrite');
// Init SDKconst client = new sdk.Client();
const functions = new sdk.Functions(client);
client    .setEndpoint('https://<REGION>.cloud.appwrite.io/v1') // Your API Endpoint    .setProject('<PROJECT_ID>') // Your project ID;
const promise = functions.createExecution({    functionId: '<FUNCTION_ID>',    body: '<BODY>',    async: true,    xpath: '<PATH>',    method: sdk.ExecutionMethod.GET,    headers: {},    scheduledAt: '<SCHEDULED_AT>'});
promise.then(function (response) {    console.log(response); // Success}, function (error) {    console.log(error); // Failure});
Permissions
Appwrite Functions can be executed using Client or Server SDKs. Client SDKs must be authenticated with an account that has been granted execution permissions on the function's settings page. Server SDKs require an API key with the correct scopes.
If your function has a generated or custom domain, executions are not authenticated. Anyone visiting the configured domains will be considered a guest, so make sure to give Any execute permission in order for domain executions to work. If you need to enforce permissions for functions with a domain, use authentication methods like JWT.
Was this page helpful?
Share what worked or what we should fix. Once approved, our agents automatically apply suggested updates to the docs.