If you're building an app that developers will use, adding GitHub login makes things easier for your users. In this tutorial, you'll learn how to create a GitHub login system using Vanilla JavaScript and Appwrite. By the end, your users will be able to log in with their GitHub accounts, see personalized details, and log out.
We'll go step by step, starting with setting up OAuth on GitHub, configuring Appwrite, and then connecting everything in your app. Even if you've never worked with OAuth or Appwrite before, at the end of this tutorial, you'll have a fully functional login system that you can easily integrate into any project.
Let's get started!
Prerequisites
Before we begin, ensure you have the following:
Step 1: Setting up the project
We'll begin by creating a new Vite project and installing the necessary dependencies for Appwrite. Vite is the build tool we'll use to manage the project and its dependencies.
1.1. Create a Vite project
In your terminal, navigate to the directory where you want to create your project and run the following commands:
npm create vite@latest github-auth-app --template vanilla
cd github-auth-app
npm install
These commands will create a new project folder called github-auth-app with the Vite vanilla JavaScript template. You'll also install the necessary dependencies for Vite.
Next, you can test the project by running npm run dev and opening the specified URL that Vite will provide. You should see the default Vite app for Vanilla JS.
1.2. Install the Appwrite SDK
Now, we need to install the Appwrite SDK, which will allow us to interact with Appwrite's authentication and database services.
Run this command inside your project folder:
npm install appwrite
This will add the Appwrite JavaScript SDK to your project, which we'll use later to handle GitHub OAuth authentication.
Step 2: Setting up GitHub OAuth
We need to set up an OAuth application on GitHub to enable authentication for users using their GitHub accounts.
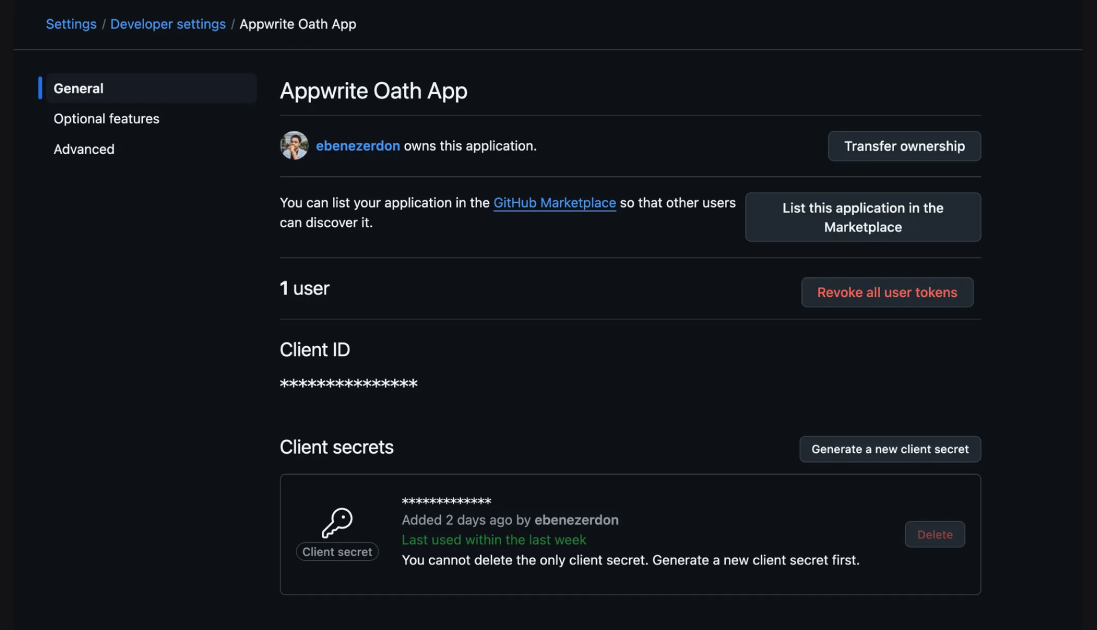
2.1. Create a new OAuth app on GitHub
Go to your GitHub account.
Navigate to Settings > Developer settings.
Click on OAuth Apps.
Click New OAuth App.
You'll see a form titled Register a new OAuth app. This is where you'll fill in the details of your GitHub OAuth app:
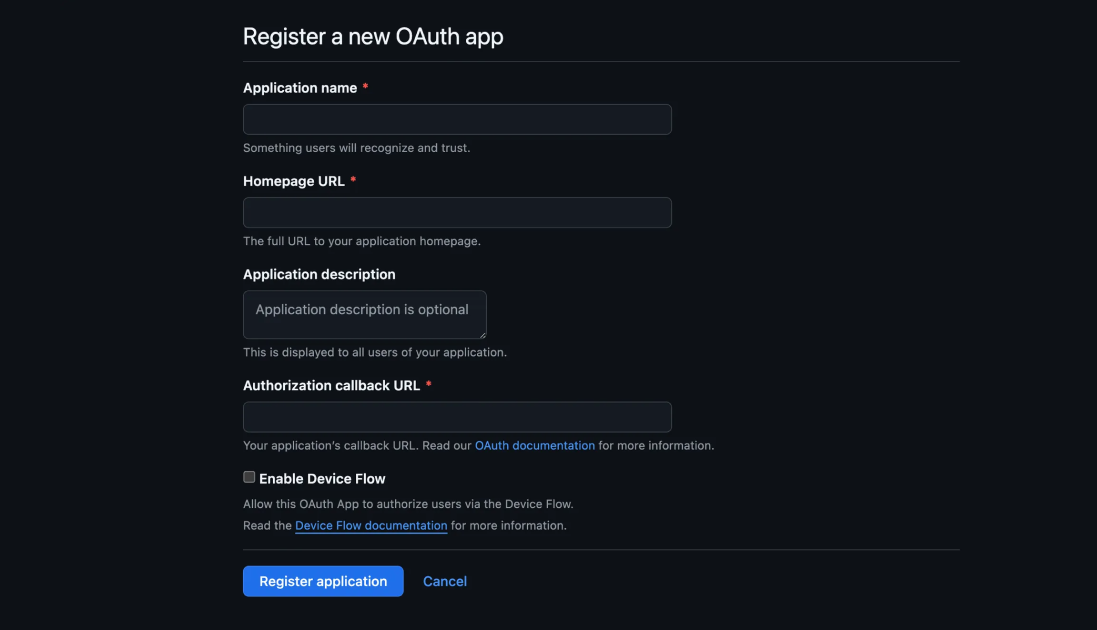
Application Name: You can name it "GitHub Auth with Appwrite".
Homepage URL: Input your homepage URL. You can use your localhost URL for now.
Authorization callback URL: You can use the same URL as your homepage URL for now. We'll update this later with a value generated by Appwrite.
Once you've filled out the form, click Register Application. GitHub will provide you with a Client ID and Client Secret. Save these details because we'll need them when configuring Appwrite.
Step 3: Setting up Appwrite
Now that we have our GitHub OAuth app set up, let's move on to configuring Appwrite. Appwrite will handle the OAuth process and act as the backend for our authentication flow.
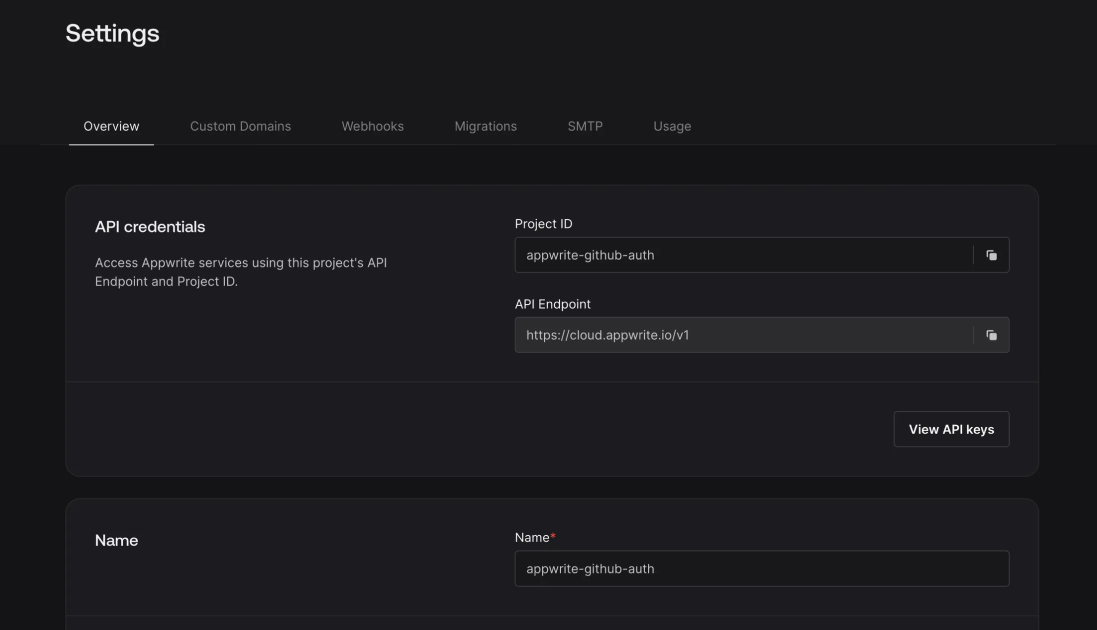
3.1. Create a new Appwrite project
If you already have an Appwrite project, you can skip this step.
Log in to your Appwrite console.
Click on Projects and then + Create Project.
Give the project a name and click Create.
Take note of the Project ID and API Endpoint for this project, as we will need these later when configuring our frontend. You can find these in the Settings page of your Appwrite project.
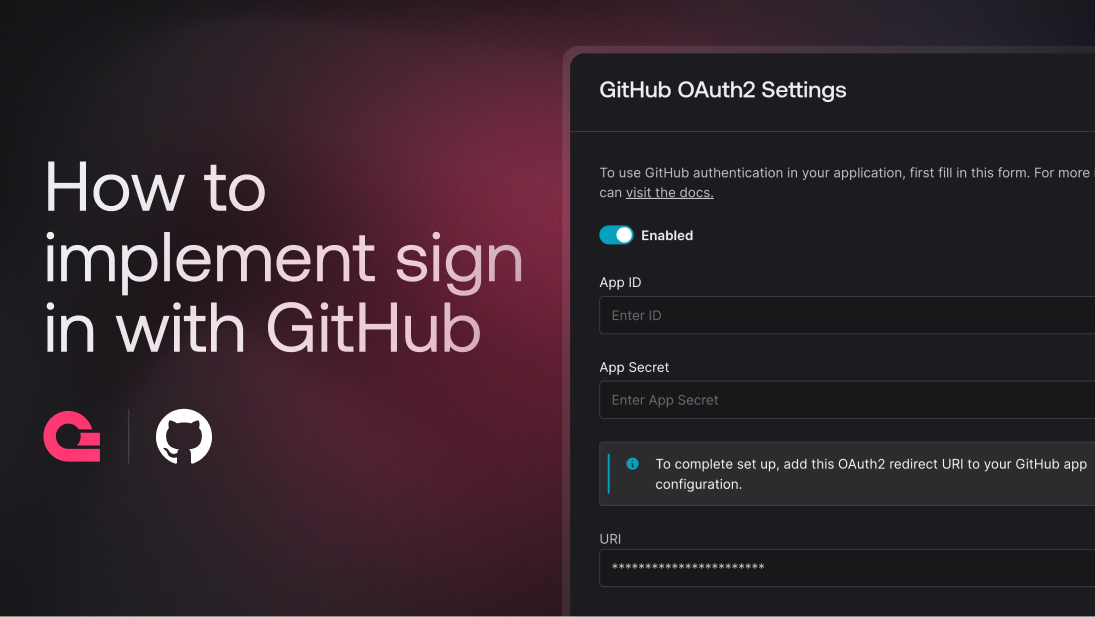
3.2. Add GitHub as an authentication provider
Inside your Appwrite project, go to the Auth section from the left-hand menu.
Click Settings and scroll down to the OAuth2 Providers section
Select GitHub from the list of providers.
Enter the Client ID and Client Secret that you obtained from GitHub earlier.
At the bottom of the form, you'll see a URI field. This is the Authorization Callback URL that you'll need for GitHub.
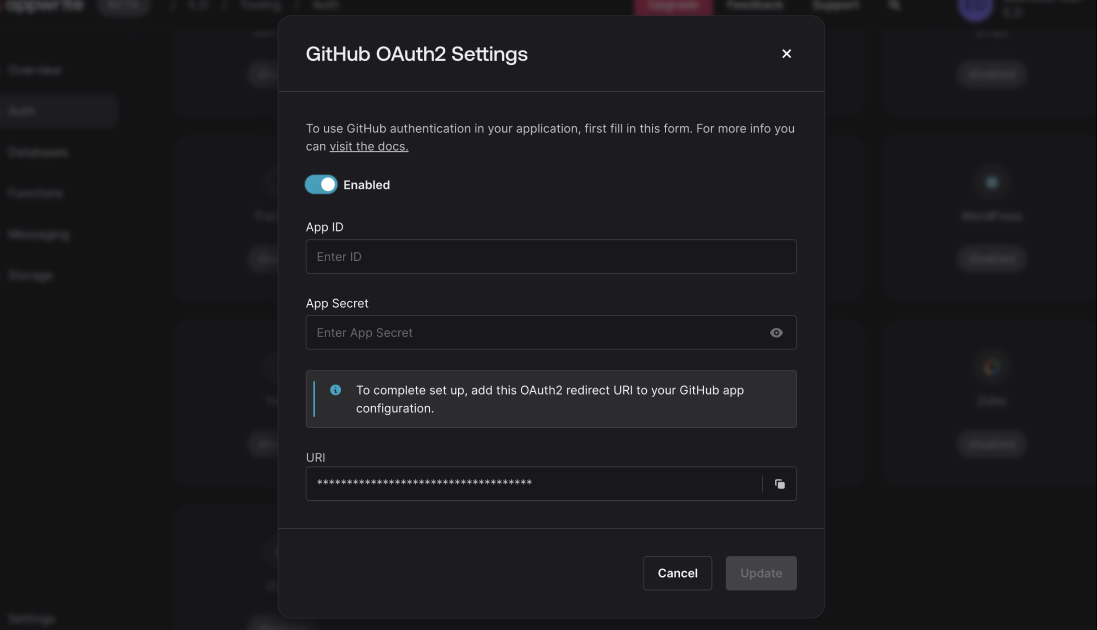
You need to copy this URL and update the callback URL in your GitHub OAuth app (from Step 2.1) to this new value.
With this, Appwrite will be configured to handle GitHub OAuth.
Step 4: Configuring the frontend project
Next, let's set up our project to communicate with Appwrite using the Client ID and API details from Appwrite.
4.1. Create an .env file
In the root of your project, create a file called .env and add the following environment variables:
VITE_APPWRITE_ENDPOINT=[your_appwrite_endpoint]
VITE_APPWRITE_PROJECT_ID=[your_appwrite_project_id]
Replace [your_appwrite_endpoint] and [your_appwrite_project_id] with the actual values from your Appwrite project.
These environment variables will be used by Vite and Appwrite to authenticate users and make API calls.
Step 5: Building the app
Now let's start writing the code to handle the GitHub OAuth functionality.
5.1. Setting up the HTML
We'll start by setting up the HTML structure of our app.
Open the index.html file inside the public folder and replace its contents with this:
<!DOCTYPE html>
<html lang="en">
  <head>
    <meta charset="UTF-8" />
    <meta name="viewport" content="width=device-width, initial-scale=1.0" />
    <title>GitHub Auth with Appwrite</title>
  </head>
  <body>
    <div id="app"></div>
    <script type="module" src="/main.js"></script>
  </body>
</html>
Here, we have a simple HTML file with an empty <div> element (with the ID as app) where our JavaScript code will dynamically insert the login buttons or user information.
5.2. Initializing the Appwrite client
Next, let's set up the Appwrite client and handle authentication.
Open main.js and replace what's currently in it. We'll start by initializing the Appwrite client. Add this code to your main.js file:
/* Import the required Appwrite modules */
import { Client, Account } from 'appwrite'

/* Initialize the Appwrite client */
const client = new Client()
client
  .setEndpoint(import.meta.env.VITE_APPWRITE_ENDPOINT)
  .setProject(import.meta.env.VITE_APPWRITE_PROJECT_ID)

/* Create an instance of the Account service */
const account = new Account(client)
This block of code initializes the Appwrite client with the endpoint and project ID from our .env file. The Account service will allow us to manage the user's authentication.
5.3. Handling user authentication
Now that we have the Appwrite client set up, let's handle user authentication using GitHub OAuth. We'll first add code to check if the user is already authenticated.
Add the following block to your main.js file:
/* Declare a variable to store the user */
let user = null

/* Function to check if a user is already logged in */
const checkSession = async () => {
  try {
    user = await account.get()
    updateUI()
  } catch (error) {
    if (error.code === 401) {
			/* User is not logged in */
      user = null
    } else {
      console.error('Session error:', error)
    }
    updateUI()
  }
}
Let's break down what's happening in the code:
account.get(): This function retrieves the current user session. If the user is logged in, it returns their details. If not, an error is thrown.
Session Error Handling: If the error code is 401, it means the user isn't logged in. We handle this by setting user to null.
Next, we'll update the UI based on whether the user is logged in or not.
5.4. Updating the UI based on authentication state
Now, let's create the updateUI function that will render different content based on whether the user is logged in or logged out.
Add this code next:
/* Get the app element from the DOM */
const app = document.querySelector('#app')
/* Function to update the UI based on the user's authentication state */
const updateUI = () => {
if (user) {
/* If the user is logged in, show a welcome message and logout button */
app.innerHTML = `
<h1>Welcome, ${user.name}!</h1>
<button id="logout">Logout</button>
`
document.querySelector('#logout').addEventListener('click', logout)
} else {
/* If the user is logged out, show a login button */
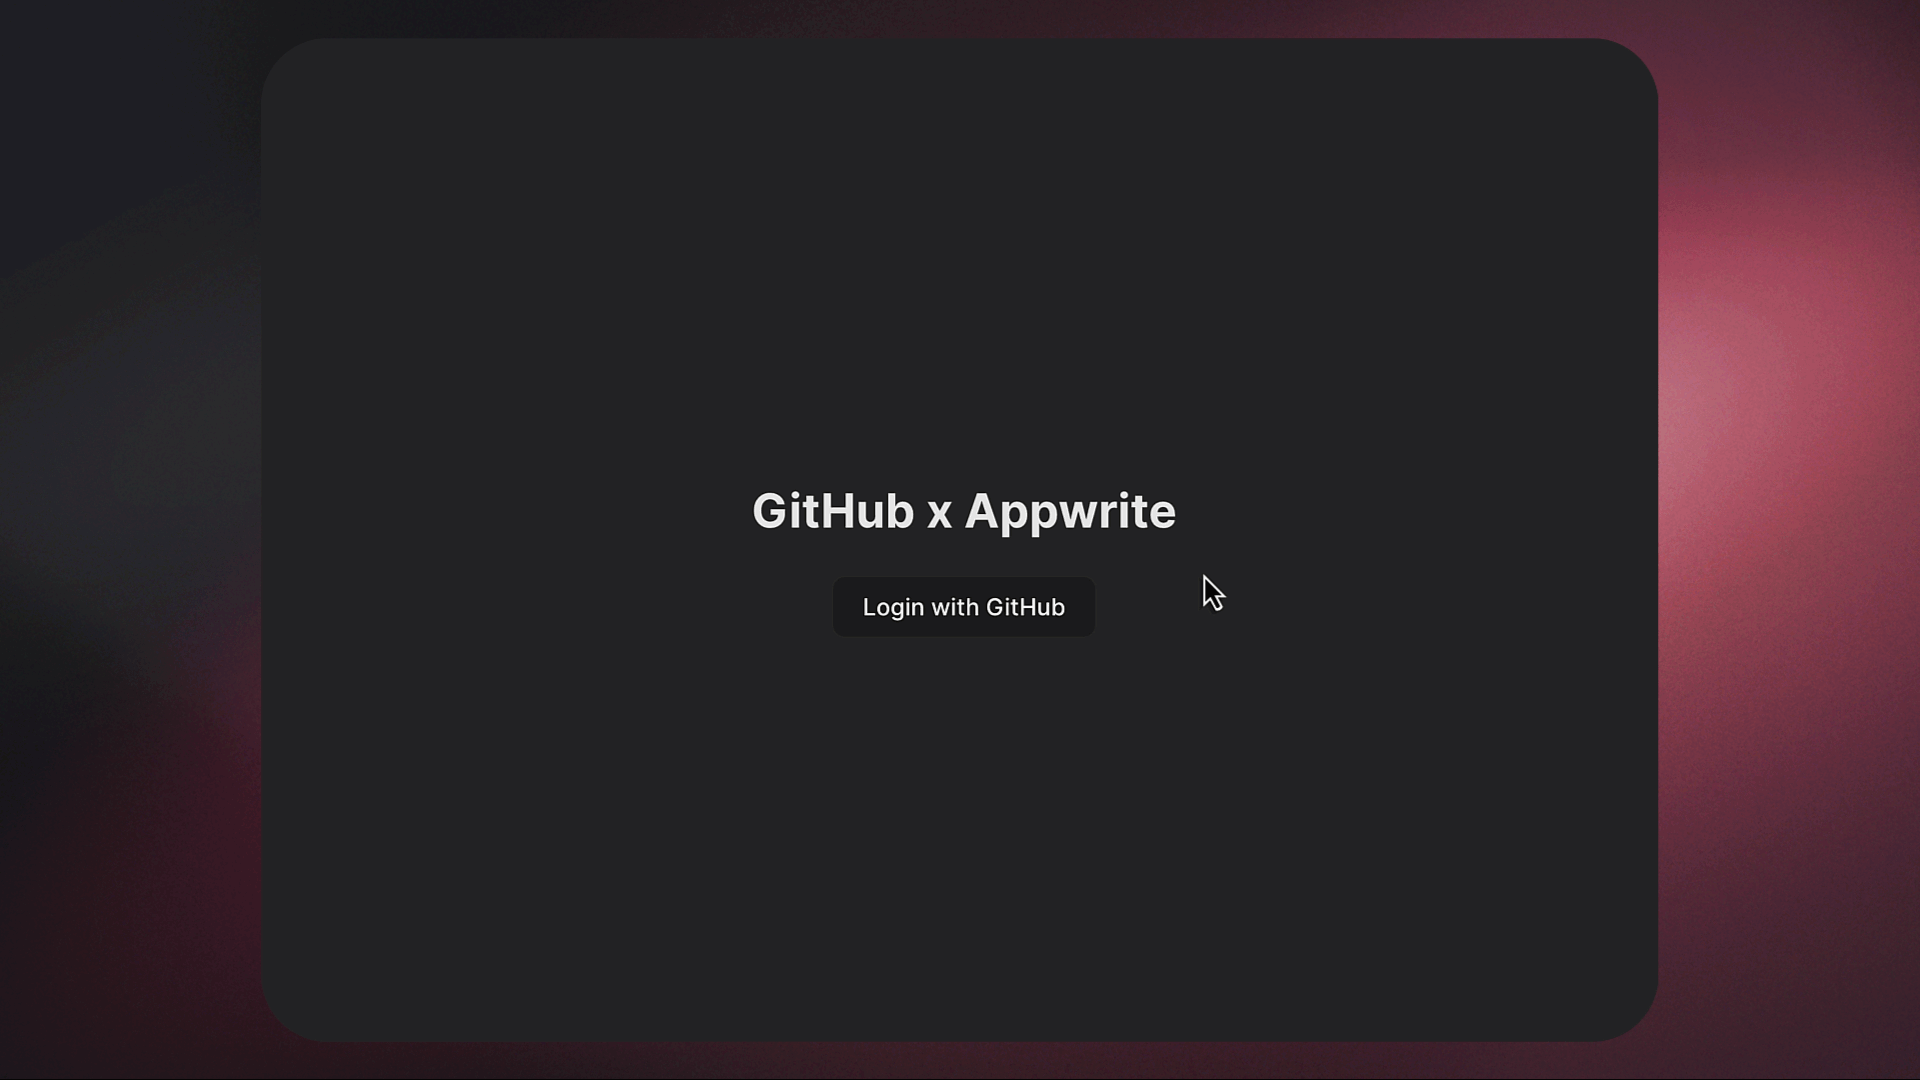
app.innerHTML = `
<h1>GitHub x Appwrite</h1>
<button id="login">Login with GitHub</button>
`
document.querySelector('#login').addEventListener('click', login)
}
}
In this code:
Logged-in State: If the user is logged in, the app displays a welcome message and a Logout button.
Logged-out State: If the user is not logged in, the app displays a Login with GitHub button.
5.5. Implementing the login and logout functionality
Finally, let's implement the login and logout functions to handle the OAuth process.
Add the following code to your main.js file:
/* Function to log in using GitHub OAuth */
const login = async () => {
  try {
    await account.createOAuth2Session(
      'github',
      'http://localhost:5174/',// Redirect here on success
      'http://localhost:5174/',// Redirect here on failure
    )
  } catch (error) {
    console.error('Login error:', error)
  }
}

/* Function to log out */
const logout = async () => {
  try {
    account.deleteSession('current') // Delete the current session
    user = null
    updateUI()
  } catch (error) {
    console.error('Logout error:', error)
  }
}

/* Check if user is logged in when the app loads */
checkSession()
Let's look at the functions we've added:
login(): This function creates an OAuth session with GitHub. If the login is successful, the user will be redirected back to the app.
logout(): This function logs the user out by deleting the current session in Appwrite.
We also call checkSession() when the app loads to check if the user is already authenticated.
Don't forget to change the redirect URLs in the login() function to your app's URL.
Step 6: Running and testing the app
Now that everything is set up, let's run the app and test it.
Start the development server
If your app isn't already up, start it by running the following command on your terminal:
npm run dev
This will start the development server. Open your browser and go to the URL displayed in your terminal. You should see the login screen with a Login with GitHub button.
Test the authentication flow
Click the Login with GitHub button. This will redirect you to GitHub for authentication.
After logging in, you'll be redirected back to the app, and you should see a welcome message with your GitHub username.
Click the Logout button to end the session and return to the login screen.
Conclusion
You've just built a simple GitHub authentication app using Vite, Vanilla JavaScript, and Appwrite. Throughout the tutorial, we incrementally built the app, and you learned how to:
Set up OAuth2 authentication with GitHub.
Use Appwrite to handle authentication.
Manage a simple UI for login and logout.
From here, you can expand the app by integrating additional GitHub APIs or adding features such as fetching repositories or displaying more user information. You can even add a database using Appwrite to store user information.