You can send, schedule, and manage push notifications to your apps using Appwrite Messaging. Push notifications can be used to deliver new message notifications, app updates, promotional offers, and other messages straight to your user's devices.
Push notifications must be sent through third-party providers, like Apple Push Notification service and Firebase Cloud Messaging. The push notification APIs for Apple and Android devices can only be accessed through these services.
You must configure these services before you can send your first push notification.
Before sending your first push notification, your application must register itself for push notification, then provide the device token to Appwrite.
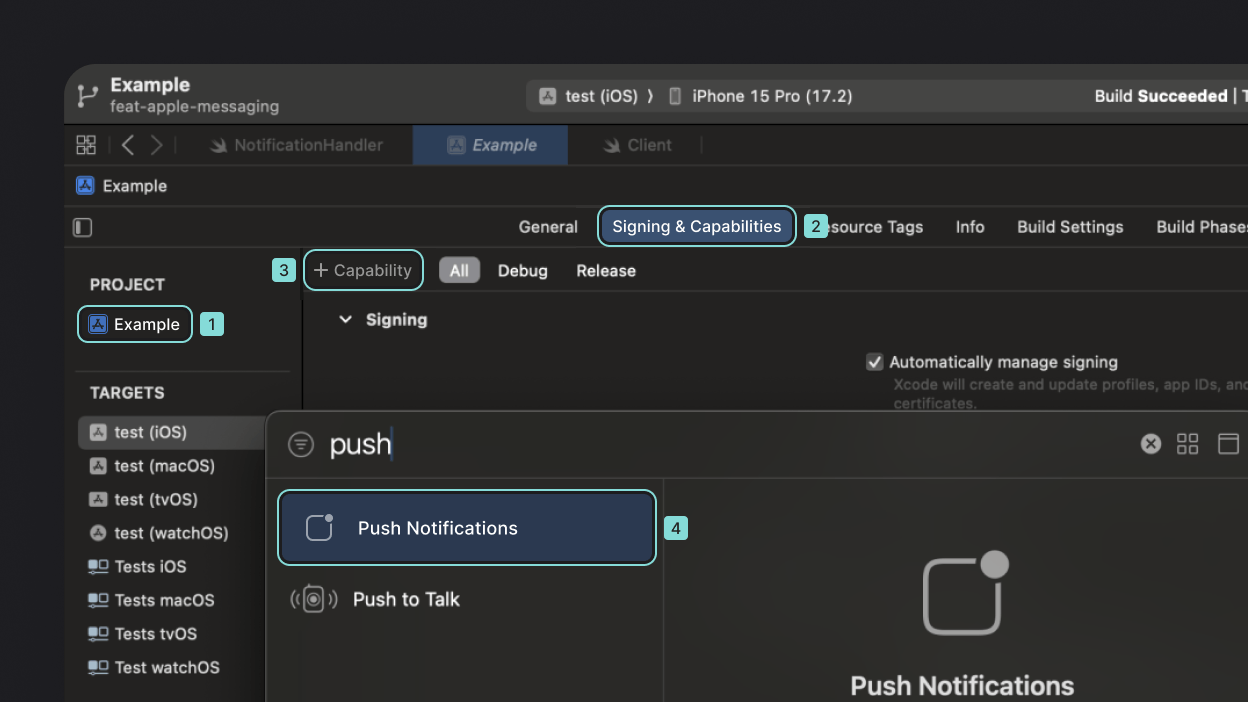
First, enable push notification in your app. Add push notification capability to your app by clicking your root-level app in XCode > Signing & Capabilities > Capabilities > Search for Push Notifications.


First, register for remote notifications in your app delegate's application(_:didFinishLaunchingWithOptions:) method.
func application(
    _ application: UIApplication,
    didFinishLaunchingWithOptions launchOptions: [UIApplication.LaunchOptionsKey: Any]? = nil
) -> Bool {
    UNUserNotificationCenter.current().delegate = self
    UNUserNotificationCenter.current().requestAuthorization(options: [.alert, .badge, .sound]) { granted, _ in
        if granted {
            DispatchQueue.main.async {
                application.registerForRemoteNotifications()
            }
        }
    }
    return true
}
Next, create a handler for when the app receives the push notification device token.
func application(
    _ application: UIApplication,
    didRegisterForRemoteNotificationsWithDeviceToken deviceToken: Data
) {
    /* store this `token` */
    let token = deviceToken.map { String(format: "%.2hhx", $0) }.joined()
}
Since the token is saved in UserDefaults, you can access it from anywhere in your app. With this saved apnsToken, you can create a push target with Appwrite when the user logs in. Each push target is associated with an account, heres an example with an email password login. The same logic applies to all types of login methods.
func login() async {
    do {
        let session = try await account.createEmailPasswordSession(email: username, password: password)

        let token = /* Retrieve the stored push token */

        try await account.createPushTarget({
            targetId: ID.unique(),
            identifier: token
        })
    } catch {
        print("Login failed: \(error.localizedDescription)")
    }
}
Before you can send push notifications using FCM, make sure you'd followed the steps to Add Firebase to your Android project.
After adding Firebase to your Android project and adding the google-services.json to your project, initialize Firebase in your main activity and fetch the FCM registration token.
class MainActivity : AppCompatActivity() {
    override fun onCreate() {
        // Initialize Firebase
        FirebaseApp.initializeApp(this)

        // Set the FCM token
        FirebaseMessaging.getInstance().token.addOnCompleteListener(OnCompleteListener { task ->
            if (task.isSuccessful) {
                /* store this `token` */
                val token = task.result
            }
        })
    }
}
Appwrite's push targets are associated with accounts. Typically, you would create a push target when the user logs in.
For example, when the user logs in with email and password, your app can register itself as a target after handling the login.
fun login(email: String, password: String) {
    viewModelScope.launch {
        try {
            val session = account.createEmailPasswordSession(email, password)

            let token = /* Retrieve the stored push token */

            /* store the `target.id` */
            val target = account.createPushTarget(
                targetId = ID.unique(),
                identifier = token
            )
        } catch (e: AppwriteException) {
            Log.e("Login", "Failed: ${e.message}")
        }
    }
}
Lastly, because FCM push tokens can change, we need to add a service to handle FCM token refreshes and update the target with Appwrite Messaging.
Create a new service that extends FirebaseMessagingService which handles the event where the FCM token is updated.
class MessagingService : FirebaseMessagingService() {
    override fun onNewToken(token: String) {
        super.onNewToken(token)

        /* store the `token` */
        /* If the user is logged in, update the push target */
        runBlocking {
            account?.updatePushTarget(/* retrieve saved `target.id` */, token)
        }
    }
}
In your AndroidManifest.xml, register this new service.
<service android:name="<YOUR_NOTIFICATION_HANDLER_SERVICE>" android:exported="false">
    <intent-filter>
        <action android:name="com.google.firebase.MESSAGING_EVENT" />
    </intent-filter>
</service>
Before you can send push notifications using FCM, make sure you'd followed the steps to Add Firebase to your iOS project.
After adding Firebase to your iOS project and adding the GoogleService-Info.plist to the root of your project.
Next, add your APNs key to Firebase.
- Head to Apple Developer Member Center > Program resources > Certificates, Identifiers & Profiles > Keys. The key needs Apple Push Notification Service enabled.
- Create a new key, note down the key ID and download your key.
- In Firebase console, go to Settings* > Cloud Messaging > APNs authentication key > click Upload. Upload your key here.
- Add push notification capability to your app by clicking your root-level app in XCode > Signing & Capabilities > Capabilities > Search for Push Notifications.
- If using SwiftUI, disable swizzling by setting
FirebaseAppDelegateProxyEnabledtoNOin yourInfo.plist.
Initialize Firebase in your app delegate's application(_:didFinishLaunchingWithOptions:) method, implement the messaging delegate protocol, and register for remote notifications.
func application(
    _ application: UIApplication,
    didFinishLaunchingWithOptions launchOptions: [UIApplication.LaunchOptionsKey: Any]? = nil
) -> Bool {
    FirebaseApp.configure()
    Messaging.messaging().delegate = self
    UNUserNotificationCenter.current().delegate = self

    UNUserNotificationCenter.current().requestAuthorization(options: [.alert, .badge, .sound]) { granted, _ in
        if granted {
            DispatchQueue.main.async {
                application.registerForRemoteNotifications()
            }
        }
    }
    return true
}
Your APNS token can change, so you need to handle the token refresh event and update the target with Appwrite Messaging. Implement didReceiveRegistrationToken, which is called when the FCM token is updated.
func messaging(_ messaging: Messaging, didReceiveRegistrationToken fcmToken: String?) {
    /* store the fcmToken */
    guard let fcmToken = fcmToken else { return }

    Task {
        do {
            _ = try await account.get()
            try await account.createPushTarget(targetId: ID.unique(), identifier: fcmToken)
        } catch {
            print("Failed to create push target: \(error.localizedDescription)")
        }
    }
}
Since the token is saved in UserDefaults, you can access it from anywhere in your app. With this saved fcmToken, you can create a push target with Appwrite when the user logs in. Each push target is associated with an account, here's an example with an email password login. The same logic applies to all types of login methods.
func login() async {
    do {
        let session = try await account.createEmailPasswordSession(email: username, password: password)

        let token = /* Retrieve stored push token */

        let target = try await account.createPushTarget(targetId: ID.unique(), identifier: token)
    } catch {
        print("Login failed: \(error.localizedDescription)")
    }
}
If you have disabled method swizzling, or you are building a SwiftUI app, you'll need to explicitly map your APNs token to the FCM registration token. Implement the didRegisterForRemoteNotificationsWithDeviceToken method to get the device token and save it to FCM.
func application(
    _ application: UIApplication,
    didRegisterForRemoteNotificationsWithDeviceToken deviceToken: Data
) {
    Messaging.messaging().apnsToken = deviceToken
}
Your app must ask for permission to receive push notification from the user.
Before your app can receive push notifications, you need to request the user for permissions. Appwrite provides a utility to help request permissions to display notificaitons.
You can learn more about requesting permissions from the Apple Developer Documentation.
First, add POST_NOTIFICATIONS to your AndroidManifest.xml.
<?xml version="1.0" encoding="utf-8"?>
<manifest xmlns:android="http://schemas.android.com/apk/res/android"
    package="YOUR_PACKAGE">
    <uses-permission android:name="android.permission.POST_NOTIFICATIONS"/>
    <!-- ... rest of your manifest -->
Then, you'll also need to request runtime permissions from your users using the android.permission.POST_NOTIFICATIONS permission.
Before your app can receive push notifications, you need to request the user for permissions. Appwrite provides a utility to help request permissions to display notificaitons.
You can learn more about requesting permissions from the Apple Developer Documentation.
When an FCM registration token is generated, the library uploads the identifier and configuration data to Firebase. If you wish to give your users the ability to explicitly opt out of sending data to Firebase, you can disable automatic initialization and manually initialize the library when the user grants permission.
Disable auto-initialization by setting FirebaseMessagingAutoInitEnabled to NO in your Info.plist.
FirebaseMessagingAutoInitEnabled = NO
Then, manually initialize the library when the user grants permission.
Messaging.messaging().autoInitEnabled = true
You can send messages in both the Appwrite Console and programmatically using the Appwrite Server SDK.
Sandbox
If you enabled Sandbox on your APNs provider, Appwrite will send push notifications to the development APNs environment. This requires you to use a Development profile in XCode.
If XCode is not default to a development profile, click your root-level app in XCode > Signing & Capabilities > Capabilities > uncheck Automatically manage signing. Then manually select a Provisioning profile that is a Distribution profile.
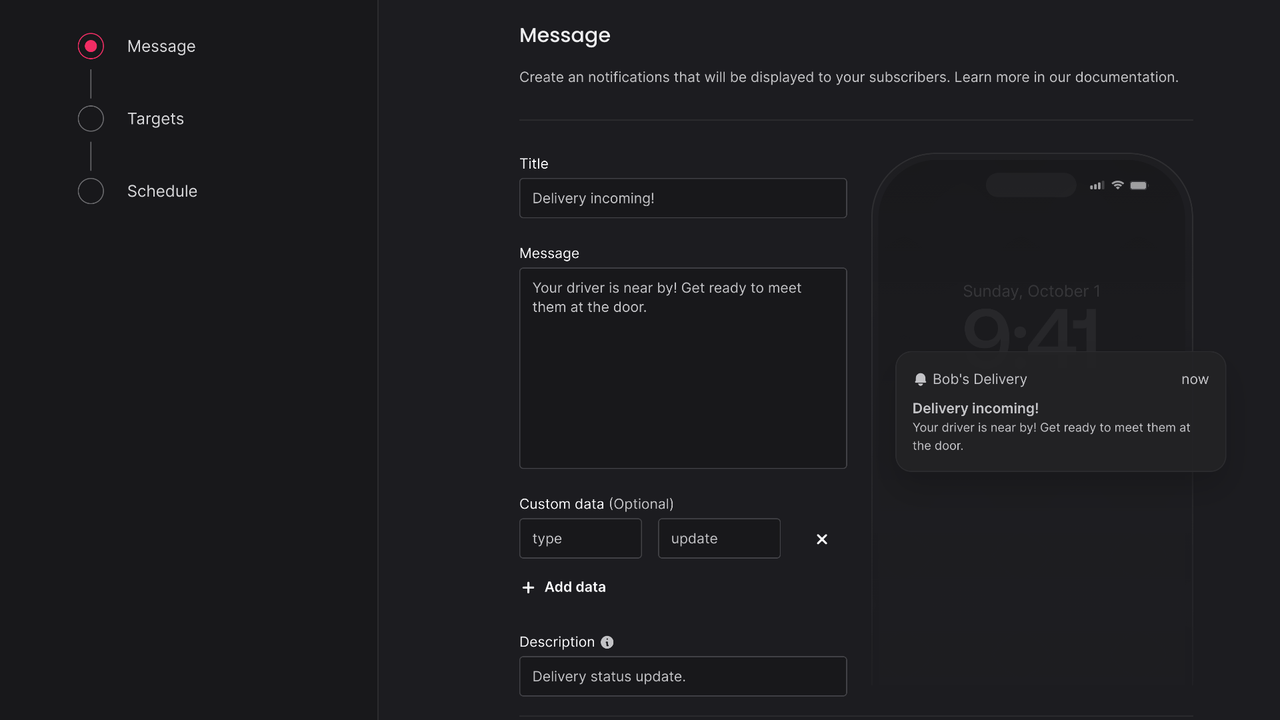
To send a test message, navigate to Messaging > Messages > Create message > Push notification.


Add your message and in the targets step, select one of your test targets. Set the schedule to Now and click Send.
Verify that you can receive the message in your inbox. If not, check for logs in the Appwrite Console or in your provider's logs.
To send a message programmatically, use an Appwrite Server SDK.