Message templates_
Communicate using your brand and voice by customizing email and SMS message templates, localized to your user's language.
5 min read
Appwrite uses emails to communicate with users to perform authentication and verification actions. Emails can be customized to fit your app's design and voice.
Each Appwrite project can have its own set of unique templates. Templates also support localization, so every template can be written in multiple languages and served depending on the configured locale.
Custom SMTP server
Appwrite Cloud has a default SMTP server to get you started. This SMTP server sends generic emails and doesn't allow customizing SMTP templates. To use custom SMTP templates, you will need to configure your own SMTP server.
Custom SMTP is available on Appwrite Cloud Pro and higher plans. You can connect a supported provider in one click, or enter the settings from any SMTP provider by hand.
One-click setup with Resend
On Appwrite Cloud, the SMTP tab starts with a One-click setup card. Connect a Resend account and Appwrite creates a sending-only API key for one of your verified domains, then fills in and enables the custom SMTP settings for you.
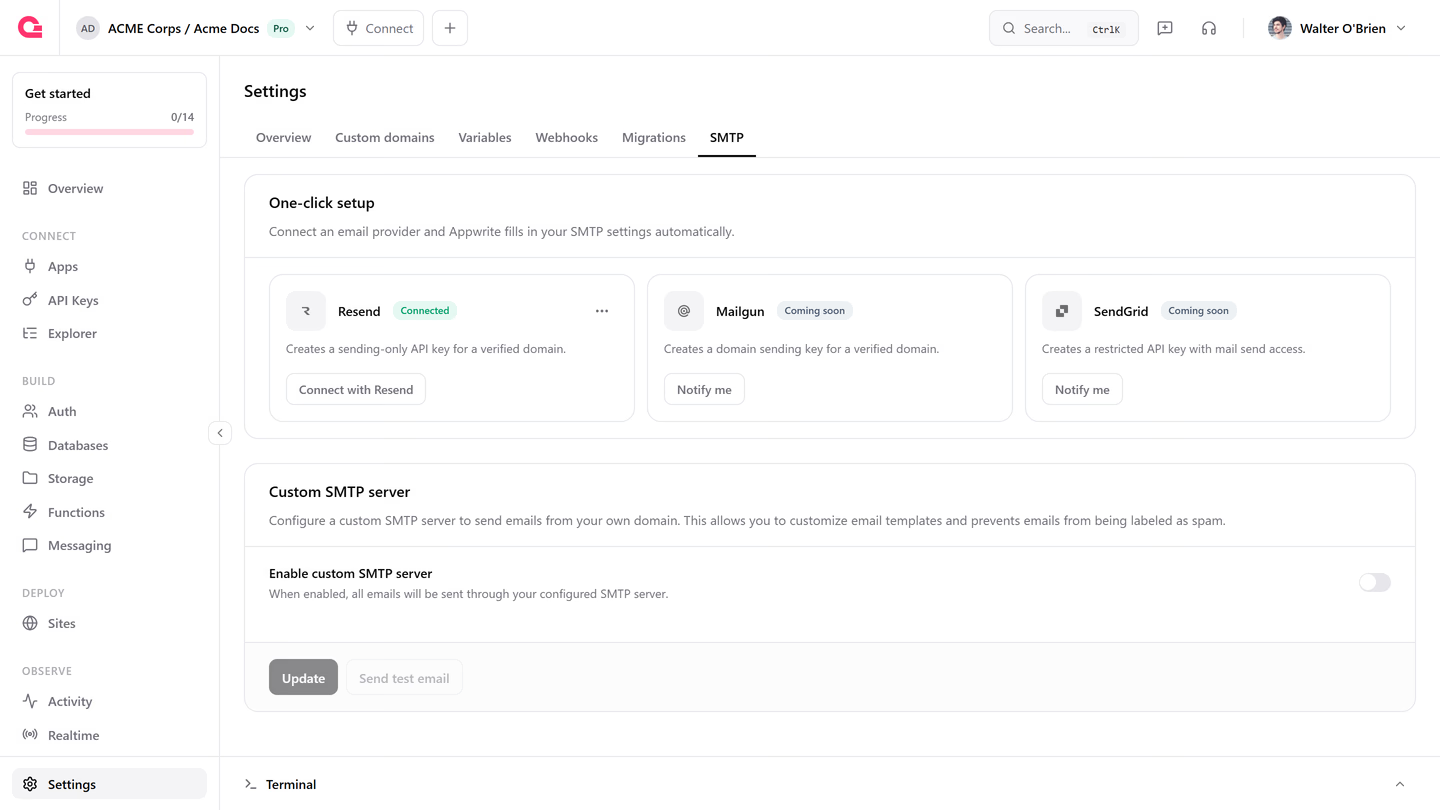
- Navigate to your project's Settings.
- Navigate to the SMTP tab.
- Under One-click setup, click Connect with Resend.
- Authorize Appwrite in Resend. You are returned to the same tab, and the Resend tile now shows Connected.
- Select a verified Domain. Domains that are not yet verified in Resend are listed but can't be selected.
- Enter a Sender name and a Sender email on the selected domain. Appwrite suggests
noreply@<domain>. - Click Set up.
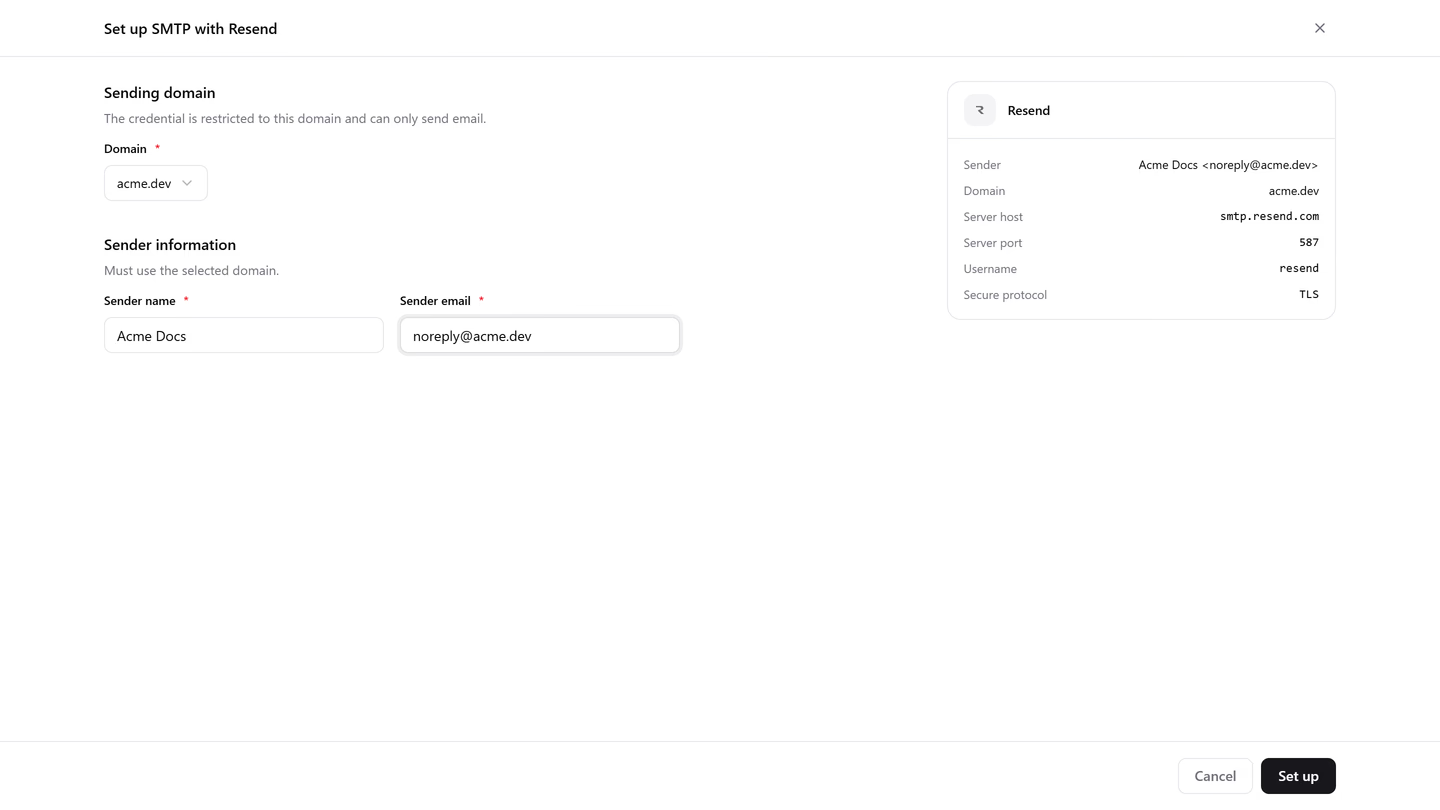
Appwrite creates an API key in your Resend account named Appwrite SMTP: <project name>. The key has sending-only permission and is restricted to the selected domain. Appwrite stores it as the SMTP password and writes the rest of the settings for you.
| Setting | Value |
|---|---|
| Server host | smtp.resend.com |
| Server port | 587 |
| Username | resend |
| Secure protocol | TLS |
| Password | The sending-only API key Appwrite created |
Custom SMTP is enabled as soon as the setup completes. Your existing reply-to email is kept. If you don't have a verified domain yet, add one in Resend's domains page and click Check again.
The connection lives on your Console account, not the project, so it shows as Connected in every project you open. Resend issues a short-lived access token that Appwrite stores on the linked identity of your Console account, and Appwrite asks you to Reconnect when it expires. To remove the connection, open the tile's menu and click Disconnect. Disconnecting removes the Resend identity from your Console account and doesn't change the SMTP settings already saved on your projects or revoke keys already in use.
Mailgun and SendGrid tiles appear as Coming soon. Click Notify me on either to be told when it ships.
Configure SMTP manually
There are many third-party SMTP providers like SendGrid and Mailgun. Before proceeding, pick an SMTP provider, create an account, and obtain Sender name, Sender email, Server host, Server port, Username, and Password.
- Navigate to your project's Settings.
- Navigate to the SMTP tab.
- Under SMTP server, toggle Custom SMTP server.
- Input Sender name, Sender email, Server host, Server port, Username, and Password from your provider.
- Click Update.
Customize templates
You can customize email templates for each of your projects in the Appwrite Console.
The built-in email service does not support custom email templates to prevent malicious templates. Configure a custom SMTP server to enable custom email templates.
- In your project, navigate to the Auth service.
- Under the Auth service, navigate to the Templates tab.
- Expand the email template you want to edit.
- Select the Template language. You can have a different template for each language your app supports.
- Update the email template fields and click Update to save your changes.
Email templates
You can customize the email templates for account verification, magic-url authentication, password resets, and user invites.
Email template components
Each email template has the following components that you can customize.
| Component | Description |
|---|---|
| Sender name | Readers will see this as a display name of the sender. |
| Sender email | Readers will see this as a display email of the sender. This email must be authenticated on the SMTP provider you've configured, otherwise it will be delivered to the spam folder. This usually means the email must end with the same domain as your SMTP username. |
| Reply to | Readers will reply to this email address instead of the sender address. You can leave this field empty, and the sender email will be used automatically. |
| Subject | The title of the email. |
| Message | The body of the email in HTML format. You can find the variables available in the Email Template Syntax section. |
Email template syntax
Variables can be used in email templates to dynamically construct unique emails for each reader. These variables can only be used in the Message field of the email template.
| Variable | Description |
|---|---|
{{project}} | The project name. |
{{team}} | The project team's name. |
{{user}} | The name of the user receiving the email. This variable is not available in the Magic URL template, as there might not be a user yet. |
{{redirect}} | The URL for the user to complete the email template's action. |
Email template examples
Here's an example of using these variables in a template.
<!doctype html><html>
<head>    <!-- <style>        ... your style here    </style> --></head>
<body style="direction: ltr">
    <div style="max-width:650px; word-wrap: break-word; overflow-wrap: break-word;  word-break: break-all; margin:0 auto;">        <table style="margin-top: 32px">            <tr>                <td>                    <h1>{{subject}}</h1>                </td>            </tr>        </table>
        <table style="margin-top: 40px">            <tr>                <td>                    <p>Hello </p>
                    <p>Follow this link to reset your {{project}} password.</p>
                    <a href="{{redirect}}" target="_blank" rel="noopener noreferrer">{{redirect}}</a>
                    <p><br />If you didn't ask to reset your password, you can ignore this message.</p>                    <br />
                    <p>Thanks                        <br />                        {{project}} team</p>                </td>            </tr>        </table>    </div>
</body>
</html>
Localization
Each template can have multiple supported locales, displayed in different format and language. This can be configured under the Template language selector of each template.
You can send messages in different languages by setting the locale with client.setLocale() in the SDKs or the X-Appwrite-Locale HTTP header. View here the list of available locales.
For example, you can send an email verification in French.
Was this page helpful?
Share what worked or what we should fix. Once approved, our agents automatically apply suggested updates to the docs.