Server-side rendering (SSR) is fully supported with Appwrite. You can use Appwrite with many SSR-oriented frameworks, such as Next.js, SvelteKit, Nuxt, Gatsby, Remix, and more.
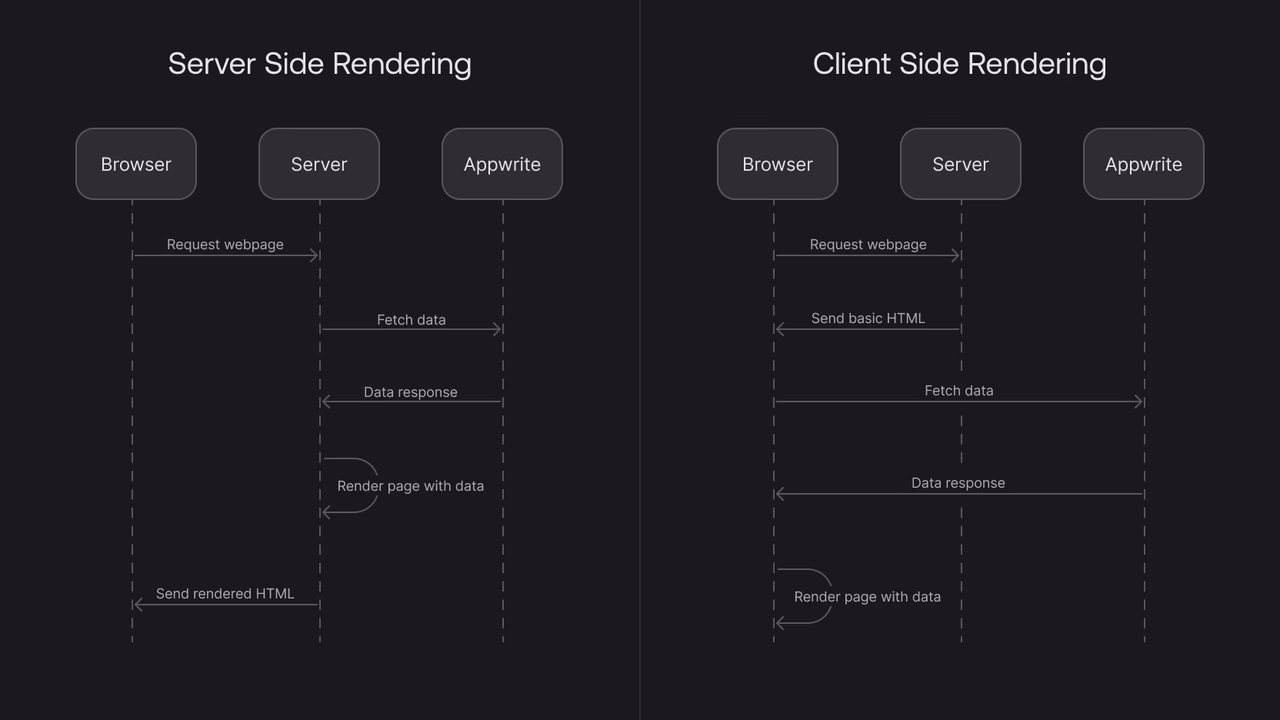
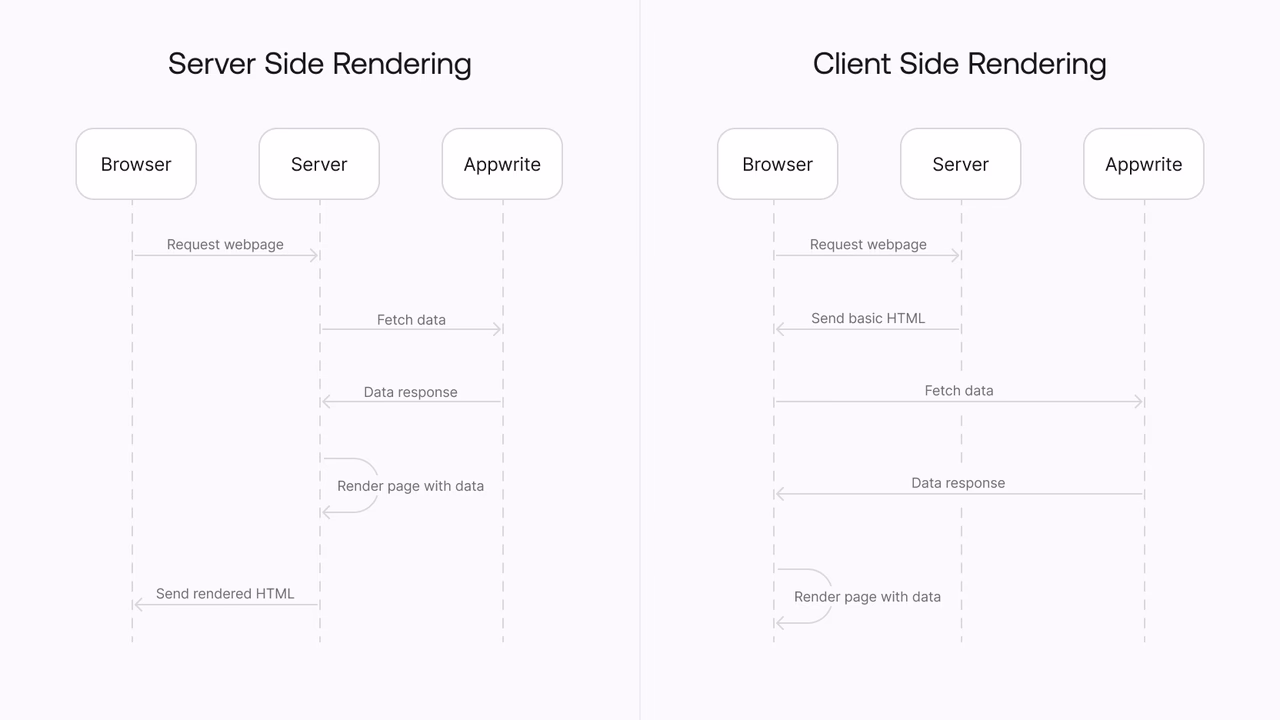
SSR is a technique where the server renders a web page and sending the fully rendered page to the client's web browser. This is in contrast to client-side rendering (CSR), where the client's web browser renders the page using JavaScript.
This guide will walk you through the process of implementing an SSR application with Appwrite.
SSR authentication flow
In client-side rendered web apps, a Client SDK is used to perform authentication directly from the client's web browser.
With server-side rendered web apps, a Server SDK is used to handle authentication against Appwrite. Authentication data is passed from the client's web browser to your server, and then your server makes requests to Appwrite on behalf of the client.
Here's a high-level overview of the authentication flow:
- The user enters their credentials in their web browser.
- The browser sends the credentials to your server.
- Your server uses the Server SDK to authenticate the user with Appwrite.
- If the authentication is successful, your server sends a session cookie to the client's web browser.
- The client's web browser sends the session cookie to your server with subsequent request.
- Your server uses the session cookie to make authenticated requests to Appwrite on behalf of the client.
Initialize clients
Server SDK required
Server-side rendering requires a Server SDK instead of a Client SDK.
In SSR, your server-side application will be making authentication requests to Appwrite and passing session cookies to your client-side app on the browser.
We'll need to initialize two Appwrite clients, one for admin requests and one for session-based requests.
Admin client
Admin clients
Admin clients should only be used if you need to perform admin actions that bypass permissions or unauthenticated requests that bypass rate limits.
To initialize the admin client, we'll need to first generate an API key. The API key should have the following scope in order to perform authentication:
| Category | Required scopes | Purpose |
Sessions | sessions.write | Allows API key to create, update, and delete sessions. |
import { Client } from "node-appwrite"; // Using the server SDK

const adminClient = new Client()
    .setEndpoint('https://<REGION>.cloud.appwrite.io/v1') // Your API Endpoint
    .setProject('<PROJECT_ID>')             // Your project ID
    .setKey('<YOUR_API_KEY>');                   // Your secret API key
It is important to use an API key, as this will allow your server requests to bypass rate limits. If you don't use an API key, your server will be rate limited as if it were a client from a single IP address.
Session client
The session client will be used to make requests to Appwrite on behalf of the end-user. It will be initialized with the session, usually stored within a cookie.
You should create a new client for each request and never share the client between requests.
Use a_session_<PROJECT_ID> as the cookie name and a custom domain for your Appwrite endpoint if you want the session to work client-side as well.
const sessionClient = new Client()
    .setEndpoint('https://<REGION>.cloud.appwrite.io/v1') // Your API Endpoint
    .setProject('<PROJECT_ID>');            // Your project ID

const session = req.cookies['a_session_<PROJECT_ID>']; // Get the session cookie from the request
if (session) {
    sessionClient.setSession(session);
}
Creating email/password sessions
The most straightforward type of session to integrate is email/password.
Create an endpoint using your server's framework of choice that accepts a username and password, and then makes a request to Appwrite to create a session. Once you have a session object, you can store it in a cookie. This will allow your users make authenticated requests to the Appwrite API from your server.
Use the secret property of the session object as the cookie value. The expire property of the session object should be used as the cookie's max age. Here's an example with Express and PHP, but the same concepts apply to most frameworks.
import express from 'express';

// Initialize admin client here
// ...

app.post('/login', async (req, res) => {
    // Get email and password from request
    const { email, password } = req.body;

    const account = new Account(adminClient);

    try {
        // Create the session using the Appwrite client
        const session = await account.createEmailPasswordSession({
            email,
            password
        });

        // Set the session cookie
        res.cookie('a_session_<PROJECT_ID>', session.secret, { // use the session secret as the cookie value
            httpOnly: true,
            secure: true,
            sameSite: 'strict',
            expires: new Date(session.expire),
            path: '/',
        });

        res.status(200).json({ success: true });
    } catch (e) {
        res.status(400).json({ success: false, error: e.message });
    }
});
We also recommend using the httpOnly, secure, and sameSite cookie options to ensure that the cookie is only sent over HTTPS, and is not accessible to JavaScript. This will prevent XSS attacks.
Making authenticated requests
Once a user has a session cookie, which will be set by the browser when it receives the /login endpoint's response, they can use it to make authenticated requests to your server.
To enable this, you will need to read the cookie value from the request, and then pass it to the Appwrite client, using the setSession helper. When the browser makes a request to your domain's endpoints, it will automatically include session cookies.
// Initialize the session client here

app.get('/user', async (req, res) => {
    // First, read the session cookie from the request
    const session = req.cookies['a_session_<PROJECT_ID>'];

    // If the session cookie is not present, return an error
    if (!session) {
        return res.status(401).json({ success: false, error: 'Unauthorized' });
    }

    // Pass the session cookie to the Appwrite client
    sessionClient.setSession(session);

    // Now, you can make authenticated requests to the Appwrite API
    const account = new Account(sessionClient);
    try {
        const user = await account.get();

        res.status(200).json({ success: true, user });
    } catch (e) {
        res.status(400).json({ success: false, error: e.message });
    }
});
Rate limits
Unauthenticated requests are subject to rate limits. Normally, rate limits are applied by an abuse key, which is usually a combination of IP and another factor like user ID. When you make unauthenticated requests from your server, however, all requests originate from the same IP and no user ID is provided. This means that all unauthenticated requests from your server will be subject to the same rate limits.
These rate limits protect your Appwrite server from abuse, if you need to make unauthenticated requests from your server, there are ways to bypass rate limits.
Making unauthenticated requests
Unauthenticated requests are used for displaying information to users before they log in. For example some apps may display all public posts on the home page, and only show private posts to logged-in users.
There are two ways to make unauthenticated requests:
| Guest sessions | Admin clients |
Uses the createAnonymousSession method to create a guest session. | Uses an API key to bypass rate limits. |
Creates a session for unauthenticated users so each user has their own rate limit. | Bypasses rate limits completely because API keys are not limited. |
Still respects access permissions. | Also bypasses access permissions. |
Can be turned into a full session later by creating an account. | Cannot be later turned into a full session. |
You can create a guest session using the createAnonymousSession method. This will create a session for unauthenticated users, and each user will have their own rate limit.
const sdk = require('node-appwrite');

// Init SDK
const client = new sdk.Client();

const account = new sdk.Account(client);

client
    .setEndpoint('https://<REGION>.cloud.appwrite.io/v1') // Your API Endpoint
    .setProject('<PROJECT_ID>') // Your project ID
;

const promise = account.createAnonymousSession();

promise.then(function (response) {
    console.log(response);
}, function (error) {
    console.log(error);
});
Forwarding user agent
Appwrite sessions record some information about the client. To set this information in a server-side context use the setForwardedUserAgent to set the end-user's user agent. While optional, these can be useful for debugging and security purposes.
client.setForwardedUserAgent(req.headers['user-agent']);
OAuth2
Server-side OAuth2 authentication requires two server endpoints:
Create an initial endpoint that redirects the user to the OAuth2 provider's authentication page using Appwrite's createOAuth2Token method. After authenticating with the provider, the user will be redirected to the success URL with userId and secret URL parameters.
import { Client, Account, OAuthProvider } from "node-appwrite"; // Using the server SDK

const adminClient = new Client()
    .setEndpoint('https://<REGION>.cloud.appwrite.io/v1') // Your API Endpoint
    .setProject('<PROJECT_ID>')             // Your project ID
    .setKey('<API_KEY>');                        // Your secret API key

app.get('/oauth', async (req, res) => {
    const account = new Account(adminClient);

    const redirectUrl = await account.createOAuth2Token({
        provider: OAuthProvider.Github,                // Provider
        success: 'https://example.com/oauth/success', // Success URL
        failure: 'https://example.com/oauth/failure', // Failure URL
    });

    res.redirect(redirectUrl);
});
Next, create a success callback endpoint that receives the userId and secret URL parameters, and then calls createSession on the server side. This endpoint returns a session object, which you can store in a cookie.
app.get('/oauth/success', async (req, res) => {
    const account = new Account(adminClient);

    // Get the userId and secret from the URL parameters
    const { userId, secret } = req.query;

    try {
        // Create the session using the Appwrite client
        const session = await account.createSession({
            userId,
            secret
        });

        // Set the session cookie
        res.cookie('a_session_<PROJECT_ID>', session.secret, { // Use the session secret as the cookie value
            httpOnly: true,
            secure: true,
            sameSite: 'strict',
            maxAge: session.expire,
            path: '/',
        });

        res.status(200).json({ success: true });
    } catch (e) {
        res.status(400).json({ success: false, error: e.message });
    }
});
Now the cookie is set, it will be passed to the server with subsequent requests, and you can use it to make authenticated requests to the Appwrite API on behalf of the end-user.
Tutorials
If you'd like to see SSR authentication implemented in a full auth example, see these tutorials.