Integrating TensorFlow with Appwrite_
Learn how to integrate TensorFlow into your Appwrite project.
2 min read
The TensorFlow API allows you to create powerful machine learning models for various tasks. This tutorial will guide you through the process of setting up a TensorFlow-based text generation model and integrating it into your Appwrite project.
We'll create a function that uses TensorFlow to generate text completions based on a given prompt. Using Appwrite functions, we'll build a user interface that allows users to input text and see the generated completion.
Prerequisites
- An Appwrite Project
- Basic knowledge of Python and TensorFlow
1. Create new function
Head to the Appwrite Console, click on Functions in the left sidebar, and then click on the Create Function button.
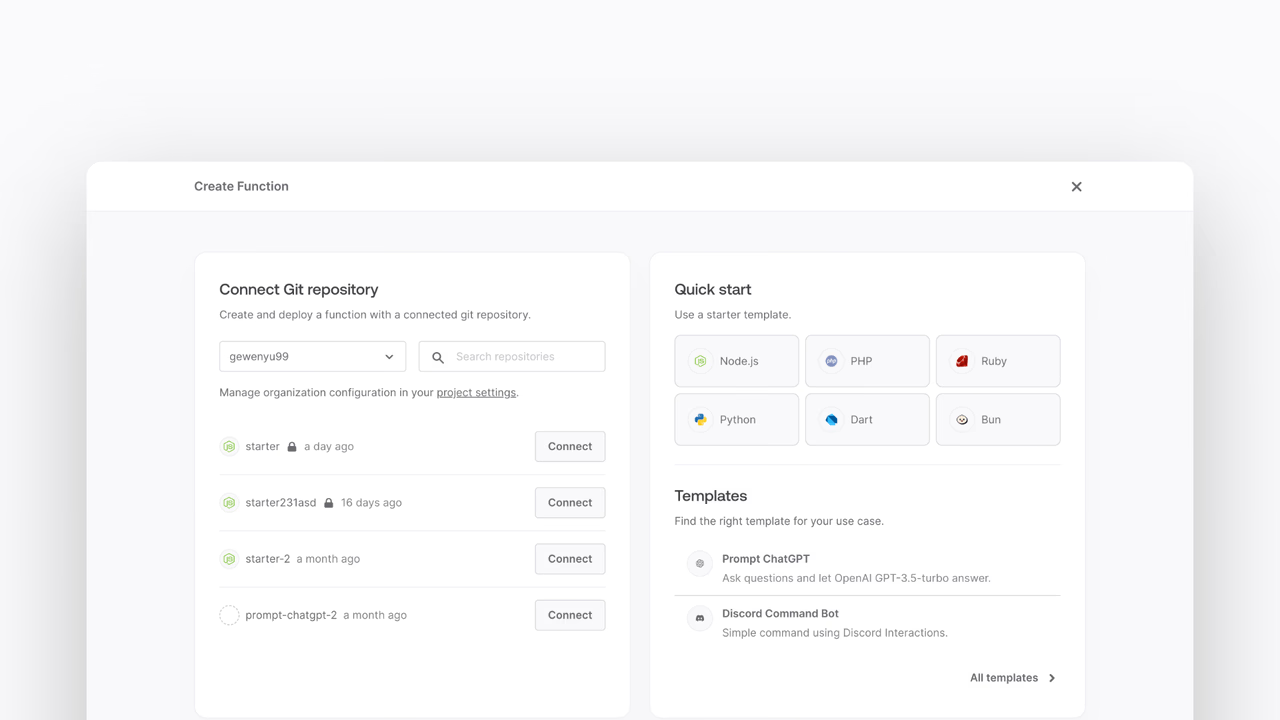
- In the Appwrite Console's sidebar, click Functions.
- Click Create function.
- Under Connect Git repository, select your provider.
- After connecting to GitHub, under Quick start, select the Python ML starter template.
- In the Variables step, add any necessary variables like
APPWRITE_API_KEY,APPWRITE_ENDPOINT, andAPPWRITE_FUNCTION_PROJECT_ID. - Follow the step-by-step wizard to create the function.
2. Add TensorFlow and necessary packages
Once the function is created, navigate to the freshly created repository and clone it to your local machine.
Add the necessary dependencies in the requirements.txt file:
tensorflownumpyInstall these packages by running:
pip install -r requirements.txt3. Train the TensorFlow model
Create a src/train.py file to train your TensorFlow model. This script will download a dataset, preprocess it, and train a model.
import tensorflow as tfimport numpy as npimport os
def main():    path_to_file = tf.keras.utils.get_file(        "shakespeare.txt",        "https://storage.googleapis.com/download.tensorflow.org/data/shakespeare.txt",    )    text = open(path_to_file, "rb").read().decode(encoding="utf-8")    vocab = sorted(set(text))    char2idx = {u: i for i, u in enumerate(vocab)}    idx2char = np.array(vocab)
    text_as_int = np.array([char2idx[c] for c in text])    seq_length = 100    char_dataset = tf.data.Dataset.from_tensor_slices(text_as_int)    sequences = char_dataset.batch(seq_length + 1, drop_remainder=True)
    def split_input_target(chunk):        input_text = chunk[:-1]        target_text = chunk[1:]        return input_text, target_text
    dataset = sequences.map(split_input_target)    BATCH_SIZE = 64    BUFFER_SIZE = 10000    dataset = dataset.shuffle(BUFFER_SIZE).batch(BATCH_SIZE, drop_remainder=True)
    vocab_size = len(vocab)    embedding_dim = 256    rnn_units = 1024
    model = tf.keras.Sequential(        [            tf.keras.layers.Embedding(                vocab_size, embedding_dim, batch_input_shape=[BATCH_SIZE, None]            ),            tf.keras.layers.GRU(                rnn_units,                return_sequences=True,                stateful=True,                recurrent_initializer="glorot_uniform",            ),            tf.keras.layers.Dense(vocab_size),        ]    )
    def loss(labels, logits):        return tf.keras.losses.sparse_categorical_crossentropy(            labels, logits, from_logits=True        )
    model.compile(optimizer="adam", loss=loss)
    EPOCHS = 10    checkpoint_dir = "./training_checkpoints"    checkpoint_prefix = f"{checkpoint_dir}/ckpt_{{epoch}}"
    checkpoint_callback = tf.keras.callbacks.ModelCheckpoint(        filepath=checkpoint_prefix, save_weights_only=True    )
    model.fit(dataset, epochs=EPOCHS, callbacks=[checkpoint_callback])
    model.save("text_generation_model.h5")    np.save("char2idx.npy", char2idx)    np.save("idx2char.npy", idx2char)
    os.remove(path_to_file)
if __name__ == "__main__":    main()
4. Create utility functions
Create a src/utils.py file with utility functions to handle file retrieval and error handling.
import os
__dirname = os.path.dirname(os.path.abspath(__file__))static_folder = os.path.join(__dirname, "../static")
def get_static_file(file_name: str) -> str:    file_path = os.path.join(static_folder, file_name)    with open(file_path, "r") as file:        return file.read()
def throw_if_missing(obj: object, keys: list[str]) -> None:    missing = [key for key in keys if key not in obj or not obj[key]]    if missing:        raise ValueError(f"Missing required fields: {', '.join(missing)}")
5. Handle GET request
Write the GET request handler in the src/main.py file. This handler will return a static HTML page.
import tensorflow as tfimport numpy as npfrom .utils import get_static_file, throw_if_missing
def main(context):    if context.req.method == "GET":        return context.res.text(            get_static_file("index.html"),            200,            {"content-type": "text/html; charset=utf-8"},        )
6. Handle POST request
Add the methods necessary to integrate with the TensorFlow model. For now, call a placeholder function generate_text that returns the prompt as is.
def main(context):    if context.req.method == "GET":        return context.res.text(            get_static_file("index.html"),            200,            {"content-type": "text/html; charset=utf-8"},        )
    try:        throw_if_missing(context.req.body, ["prompt"])    except ValueError as err:        return context.res.json({"ok": False, "error": err.message}, 400)
    prompt = context.req.body["prompt"]    generated_text = generate_text(prompt)    return context.res.json({"ok": True, "completion": generated_text}, 200)
7. Build the generate_text function
Create the generate_text function in the src/main.py file to generate text completions using the TensorFlow model.
model = tf.keras.models.load_model("text_generation_model.h5")char2idx = np.load("char2idx.npy", allow_pickle=True).item()idx2char = np.load("idx2char.npy", allow_pickle=True)
def generate_text(prompt):    input_eval = [char2idx[s] for s in prompt]    input_eval = tf.expand_dims(input_eval, 0)
    text_generated = []    temperature = 1.0
    model.reset_states()    for _ in range(1000):        predictions = model(input_eval)        predictions = tf.squeeze(predictions, 0)        predictions = predictions / temperature        predicted_id = tf.random.categorical(predictions, num_samples=1)[-1, 0].numpy()
        input_eval = tf.expand_dims([predicted_id], 0)        text_generated.append(idx2char[predicted_id])
    return prompt + "".join(text_generated)
8. Create web page
Create a HTML web page that the function will serve. Create a new file at static/index.html with some HTML boilerplate:
<!DOCTYPE html><html lang="en">  <head>    <meta charset="UTF-8" />    <meta http-equiv="X-UA-Compatible" content="IE=edge" />    <meta name="viewport" content="width=device-width, initial-scale=1.0" />    <title>Generate with TensorFlow demo</title>
    <script>      async function onSubmit(prompt) {        const response = await fetch("/", {          method: "POST",          body: JSON.stringify({ prompt }),          headers: {            "Content-Type": "application/json",          },        });
        const json = await response.json();
        if (!json.ok || json.error) {          alert(json.error);        }
        return json.completion;      }    </script>
    <script src="//unpkg.com/alpinejs" defer></script>
    <link rel="stylesheet" href="https://unpkg.com/@appwrite.io/pink" />    <link rel="stylesheet" href="https://unpkg.com/@appwrite.io/pink-icons" />  </head>  <body class="theme-dark">    <main class="main-content">      <div class="top-cover u-padding-block-end-56">        <div class="container">          <div            class="u-flex u-gap-16 u-flex-justify-center u-margin-block-start-16"          >            <h1 class="heading-level-1">Generate with TensorFlow demo</h1>            <code class="u-un-break-text"></code>          </div>          <p            class="body-text-1 u-normal u-margin-block-start-8"            style="max-width: 50rem"          >            Use this page to test your implementation with TensorFlow. Enter            text and receive the model output as a response.          </p>        </div>      </div>      <div        class="container u-margin-block-start-negative-56"        x-data="{ prompt: '', answer: '', loading: false }"      >        <div class="card u-flex u-gap-24 u-flex-vertical">          <div class="u-flex u-cross-center u-gap-8">            <div              class="input-text-wrapper is-with-end-button u-width-full-line"            >              <input x-model="prompt" type="search" placeholder="Question" />              <div class="icon-search" aria-hidden="true"></div>            </div>
            <button              class="button"              x-bind:disabled="loading"              x-on:click="async () => { loading = true; answer = ''; try { answer = await onSubmit(prompt) } catch(err) { console.error(err); } finally { loading = false; } }"            >              <span class="text">Submit</span>            </button>          </div>          <template x-if="answer">            <div class="u-flex u-flex-vertical u-gap-12">              <div class="u-flex u-flex-vertical u-gap-12 card">                <div class="u-flex u-gap-12">                  <h5 class="eyebrow-heading-2">TensorFlow Model:</h5>                </div>
                <div style="overflow-x: hidden; line-break: anywhere">                  <p class="u-color-text-gray" x-text="answer"></p>                </div>              </div>            </div>          </template>        </div>      </div>    </main>  </body></html>
The form will allow users to submit their text to the Appwrite function through a POST request. The Appwrite function will call the TensorFlow model and return the generated text to the user.
9. Test the function
Now that the function is deployed, test it by visiting the function URL in your browser. This should show the UI created earlier. To test it, write a prompt and click the submit button. After a brief moment, you should see the generated text from the TensorFlow model.
This concludes the tutorial on integrating TensorFlow with Appwrite. You now have a working example of a text generation model integrated with Appwrite functions!
Was this page helpful?
Share what worked or what we should fix. Once approved, our agents automatically apply suggested updates to the docs.