---
layout: post
title: "Add Google One Tap sign-in to your web app with Appwrite"
description: Show Google's One Tap prompt on your site and exchange its ID token for an Appwrite session. One web client ID covers the site and Android.
date: 2026-09-25
cover: /images/blog/add-google-one-tap-to-your-web-app/cover.avif
timeToRead: 7
author: atharva
category: tutorials
faqs:
- question: "What is Google One Tap?"
answer: "One Tap is a sign-in prompt from Google Identity Services. It appears on top of a web page and lets the user pick a Google account. Google then returns an ID token to the page, without a redirect."
- question: "Does Google One Tap work with Appwrite?"
answer: "Yes. One Tap returns a Google ID token, and Appwrite native sign-in creates a session from a Google ID token. Turn on native sign-in for the Google provider. Add the web client ID. Then pass the token and its nonce to account.createIdTokenSession."
- question: "Which Google client ID does One Tap use?"
answer: "The Web application client from Google Cloud. Android apps pass the same client ID to Credential Manager as the server client ID, so one entry under Web client IDs in Appwrite covers both the site and the Android app."
- question: "Does One Tap need a client secret or a redirect URI?"
answer: "No. Google returns the ID token to a JavaScript callback on the page, and Appwrite verifies the token with Google's public signing keys. The web client only needs your site's origin under Authorized JavaScript origins."
- question: "Why does the One Tap prompt not appear?"
answer: "The prompt does not appear when the origin is missing from Authorized JavaScript origins, when no Google account is signed in to the browser, or during a cooldown after the user closed it. Add a Sign in with Google button next to the prompt as a fallback."
- question: "Which version of the Appwrite Web SDK supports One Tap?"
answer: "Version 28.0.0 and later of the appwrite package."
---
Google One Tap signs a user in to your site with one click. The prompt appears on top of the page and lets the user pick a Google account. Google returns an ID token to JavaScript on the page, without a redirect.
Appwrite native sign-in, which Android and iOS apps use to exchange Google and Apple ID tokens for sessions, accepts this token too. This tutorial adds One Tap to a small site called Fieldnotes and creates an Appwrite session from the token.
# One Tap tokens name the same web client as Android tokens
The prompt comes from Google Identity Services, a script that Google hosts. The page gives the script a client ID and a callback. When the user picks an account, the script calls the callback with a `credential`, which is a Google ID token.
Each ID token names the Google client that Google issued it for. On the web, that client is the **Web application** client whose ID the page passes to Google Identity Services.
Android native sign-in uses the same client. An Android app passes the web client ID to Credential Manager as the server client ID, so its tokens also name the web client. That is why the Google provider in Appwrite asks for **Web client IDs**.
Appwrite checks that Google signed the token, that the token has not expired, and that it names one of your web client IDs. Then Appwrite returns a session in the same request. A token from Credential Manager and a token from a browser go through the same checks.
# Add your site's origin to the Google web client
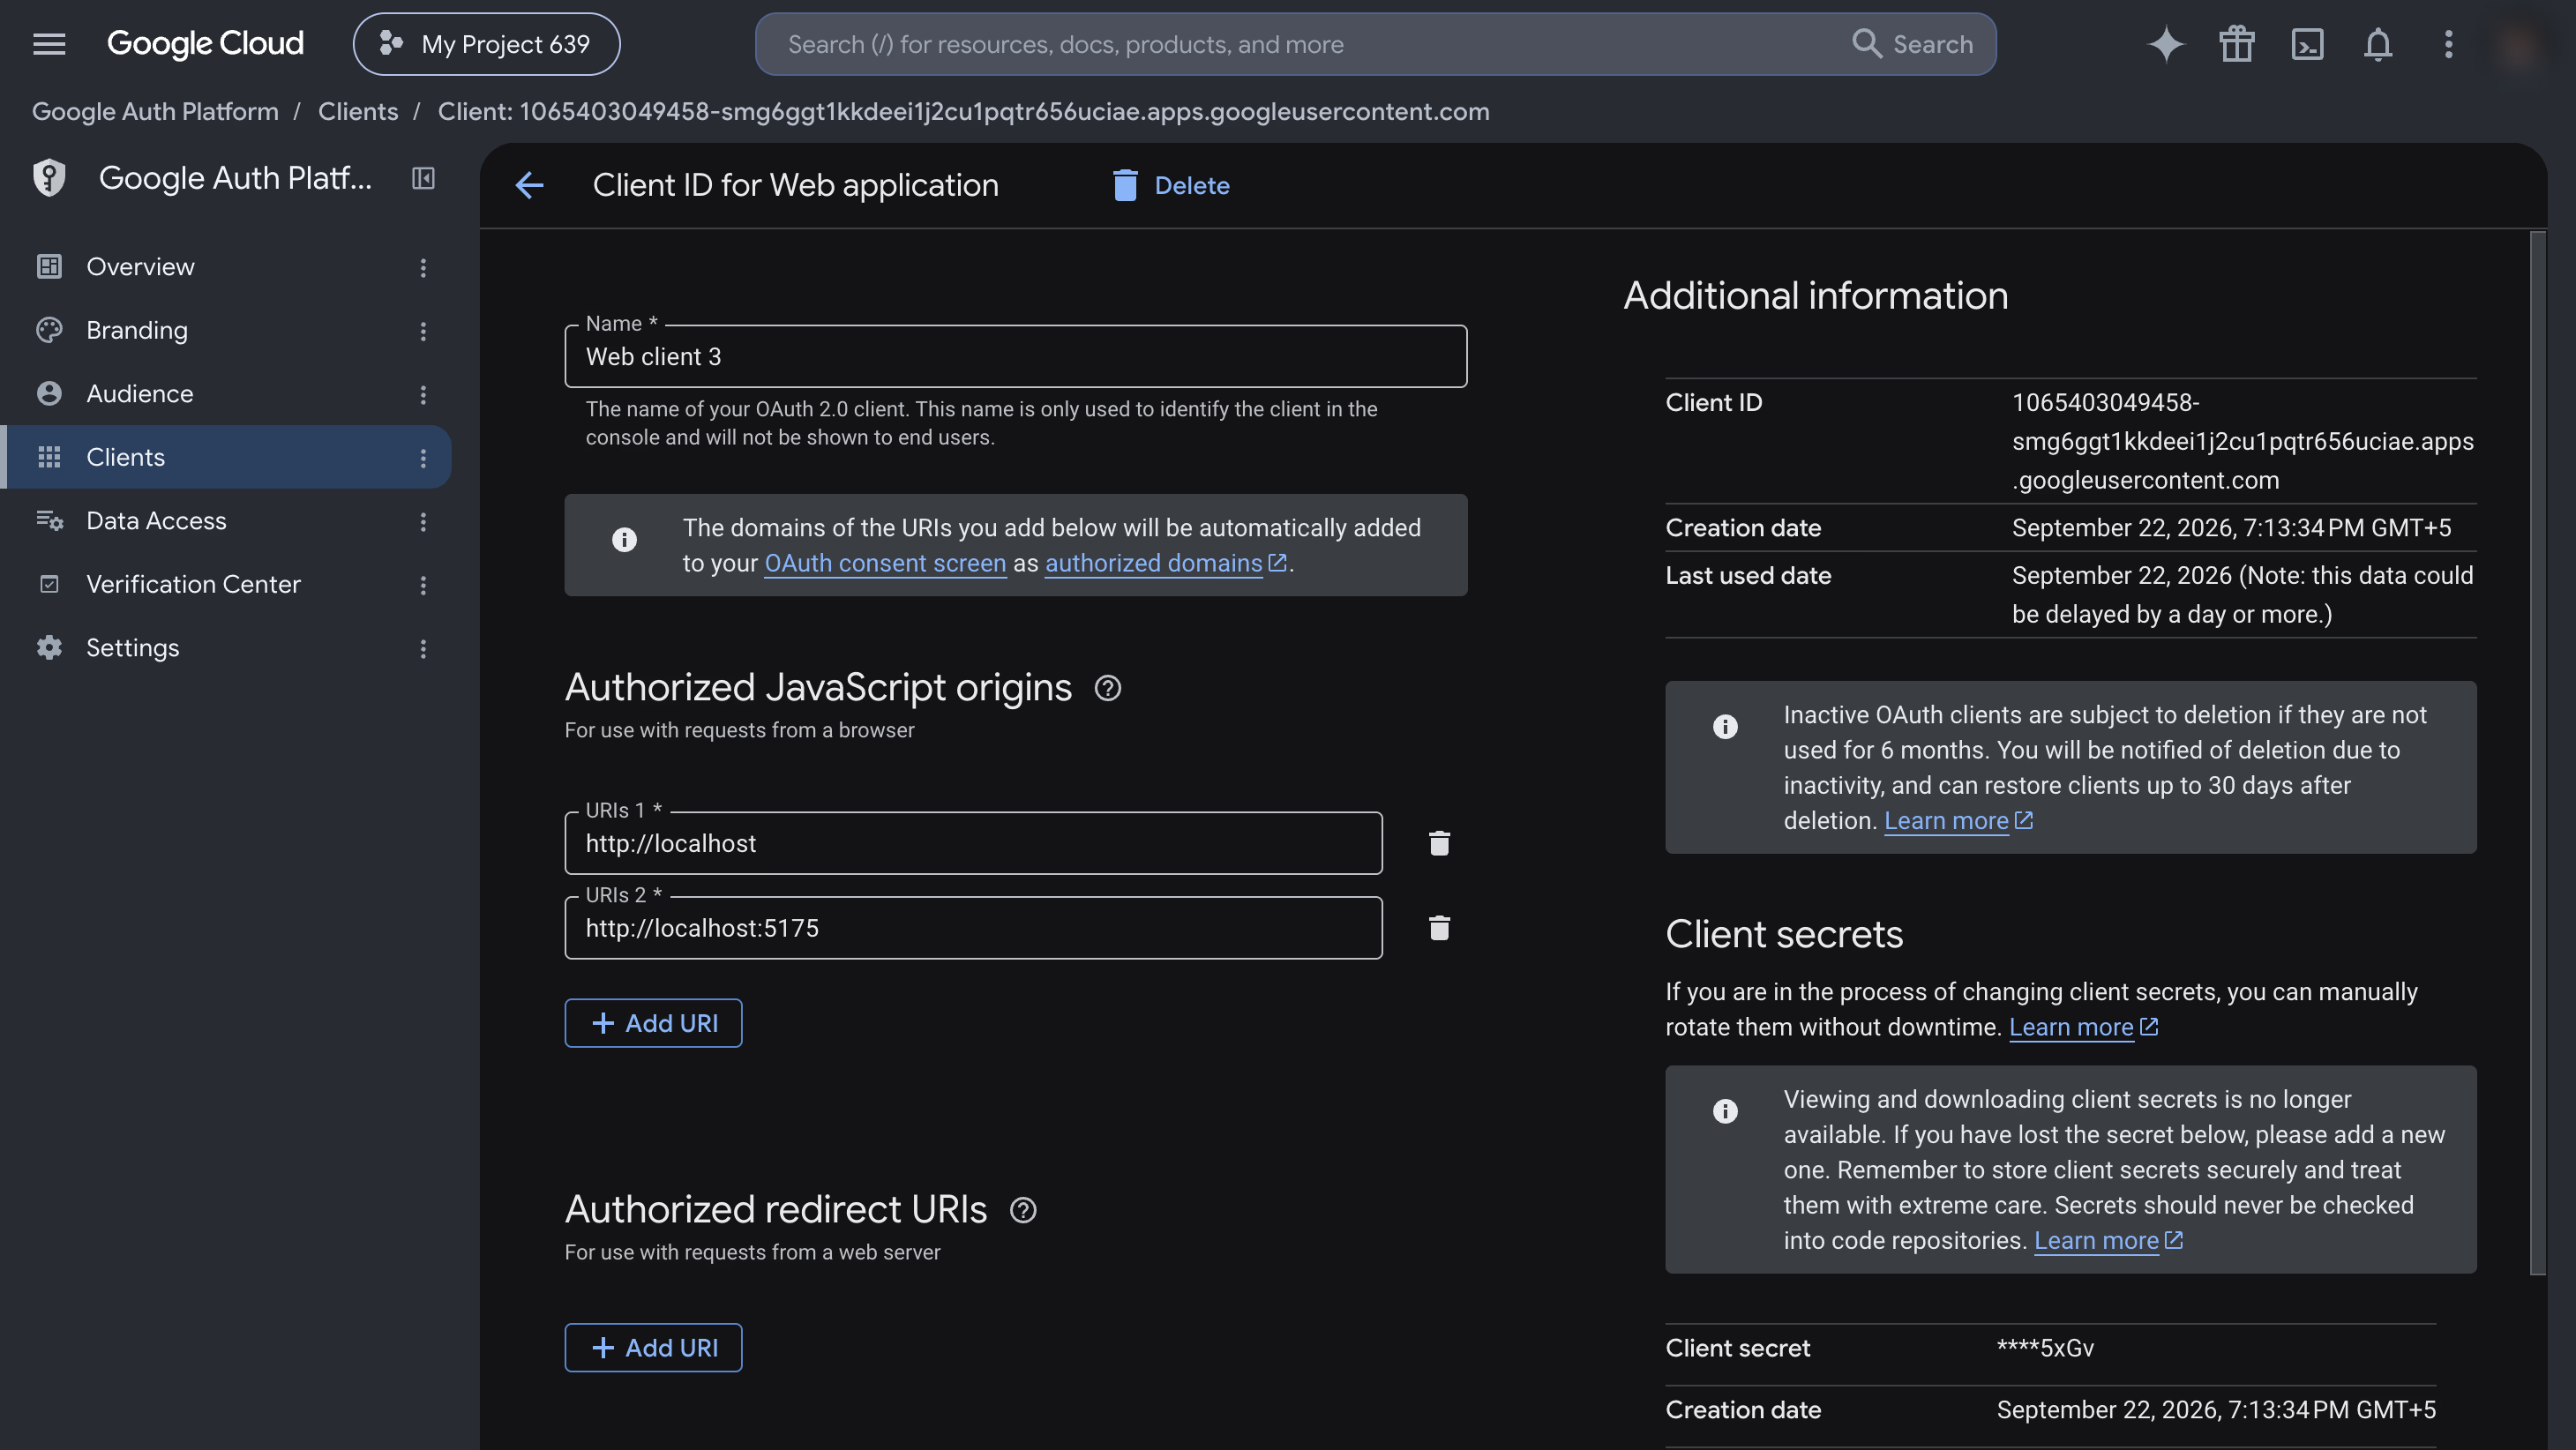
One Tap only works on origins that you add to **Authorized JavaScript origins** on the web client. An origin must use HTTPS, unless it is `localhost`. On any other origin, the prompt does not appear, and the browser console shows `The given origin is not allowed for the given client ID`.
1. Open [Google Auth Platform](https://console.cloud.google.com/auth/clients) in the Google Cloud console. Go to **Clients**.
2. Select your **Web application** client. If you do not have one, select **Create client**. Set **Application type** to **Web application** and enter a name.
3. Under **Authorized JavaScript origins**, select **Add URI**. Enter your site's origin, such as `https://fieldnotes.example.com`.
4. For local development, add `http://localhost` and `http://localhost:5173`. Use the port that your development server runs on.
5. Select **Save**.
# Turn on native sign-in for Google in Appwrite
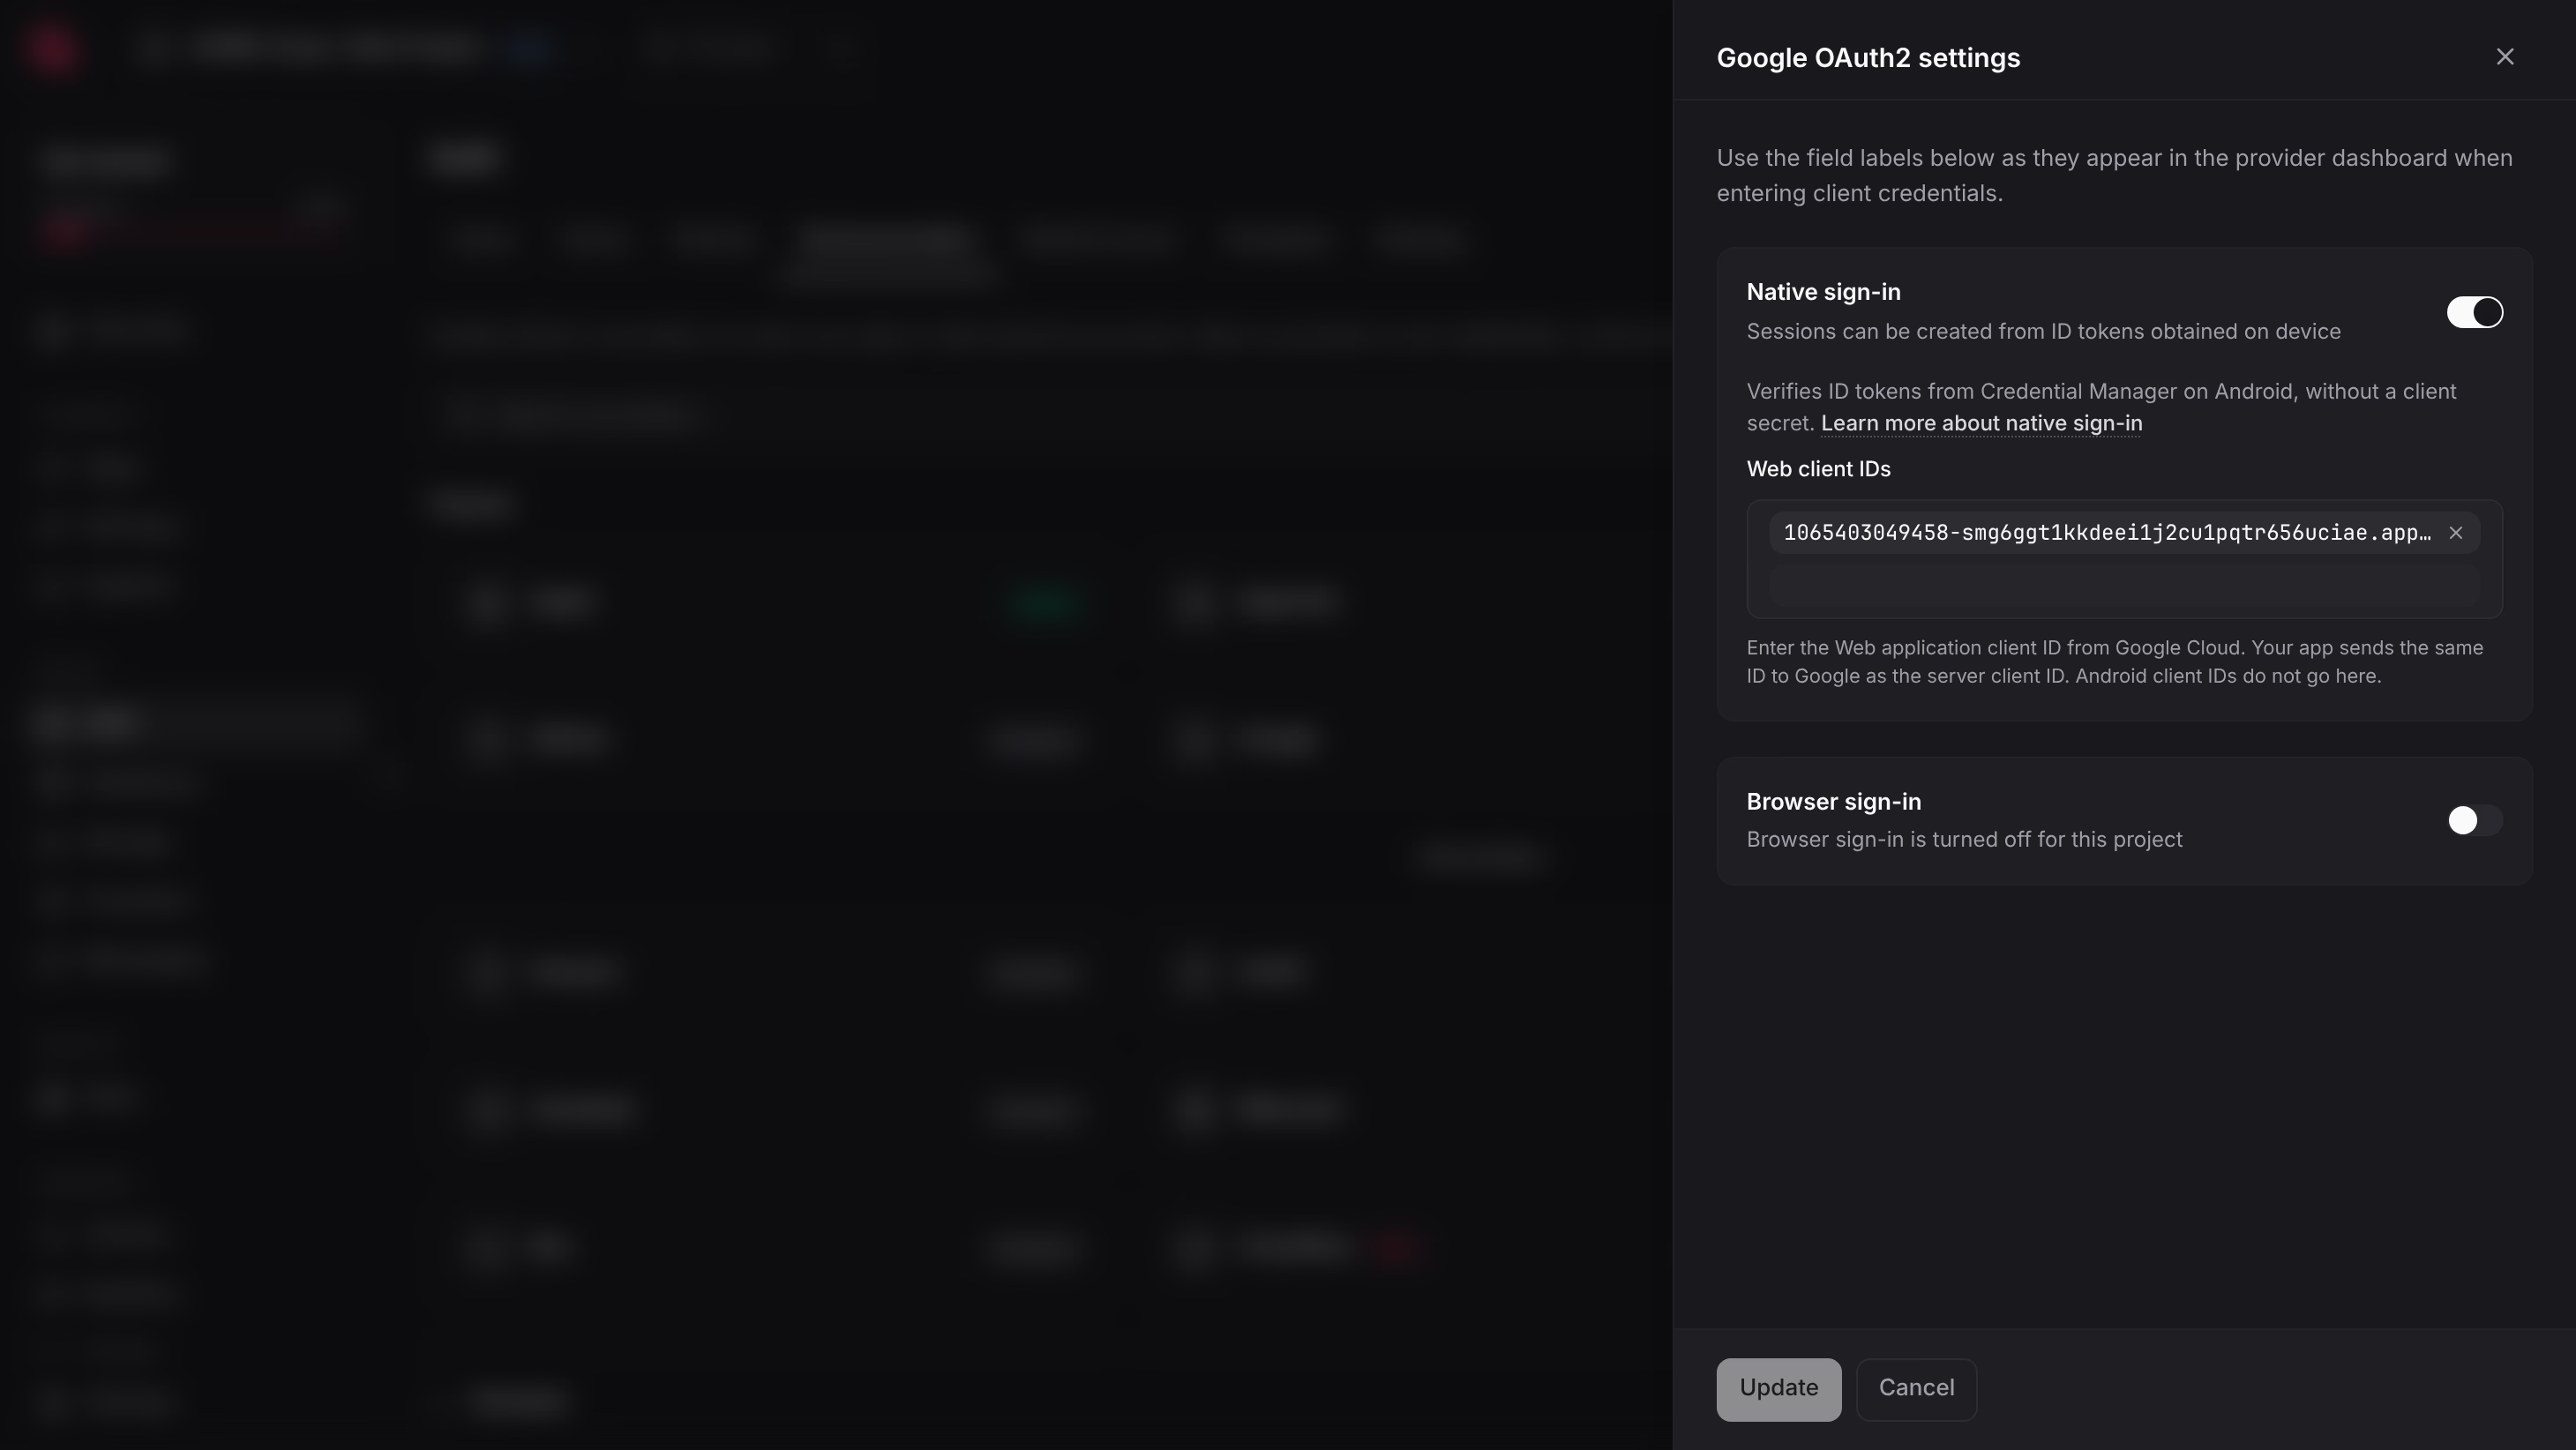
1. In the Appwrite Console, open your project. Go to **Auth**, then the **Social providers** tab.
2. Select **Google**.
3. Turn on **Native sign-in**.
4. Under **Web client IDs**, enter the client ID of the web client. Press Enter.
5. Select **Update**.
Native sign-in needs no client secret, and browser sign-in can stay off. Appwrite also accepts the client ID from browser sign-in on the same provider.
# Register your site as a web app
Appwrite only accepts browser requests from hostnames that are registered in the project.
1. On the project **Overview**, select **Add app**.
2. Select **Web** and your framework.
3. Enter a name and the hostname, such as `localhost` or `fieldnotes.example.com`.
4. Select **Register and continue**.
# Show the One Tap prompt
Install version 28.0.0 or later of the Appwrite Web SDK.
```sh
npm install appwrite@latest
```
Load the Google Identity Services script in the `` of your page.
```html
```
Then initialize the script with your web client ID, a nonce, and a callback. The callback sends the ID token and the nonce to Appwrite.
```js
import { Client, Account, IdTokenProvider } from 'appwrite';
const client = new Client()
.setEndpoint('https://.cloud.appwrite.io/v1')
.setProject('');
const account = new Account(client);
// The Google script loads asynchronously. Wait for it before you call it.
function whenGoogleReady(callback) {
if (window.google?.accounts?.id) callback();
else window.onGoogleLibraryLoad = callback;
}
function startOneTap() {
// Google puts this value in the ID token. Appwrite needs the same value.
const nonce = crypto.randomUUID();
google.accounts.id.initialize({
client_id: '',
nonce,
auto_select: true,
itp_support: true,
callback: async ({ credential }) => {
try {
await account.createIdTokenSession({
provider: IdTokenProvider.Google,
idToken: credential,
nonce,
});
showSignedIn(await account.get());
} catch (error) {
showError(error.message);
}
},
});
google.accounts.id.prompt();
}
whenGoogleReady(startOneTap);
```
**UI functions**
The `showSignedIn` and `showError` functions in this example update your page. Write them to fit your own UI. This tutorial does not cover them.
Always pass a nonce. In Chrome, the ID token can contain a nonce even when the page does not set one. If the token contains a nonce, Appwrite rejects it unless the request sends the same value. Generate a new nonce each time you call `initialize`. Send the same nonce with the token.
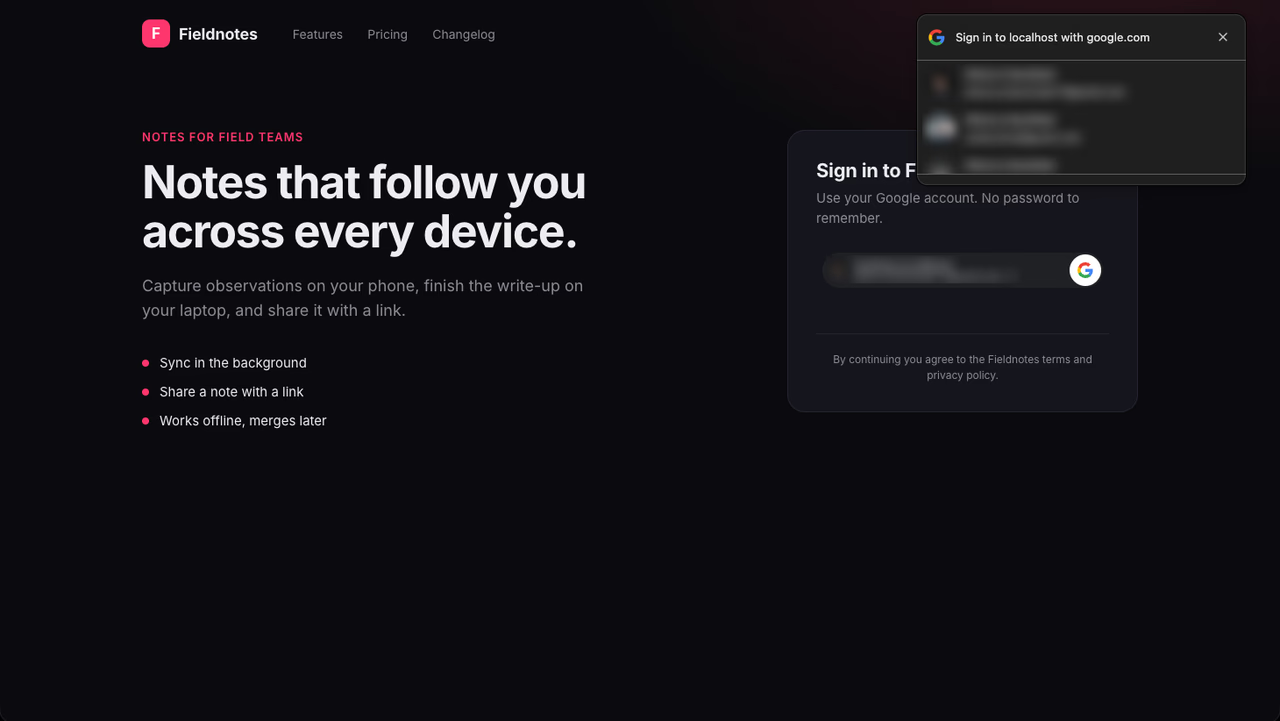
`prompt()` shows the prompt. Chrome shows it natively, as part of the browser, through the Federated Credential Management (FedCM) API. In Chrome, the prompt shows your site's domain. The following sections explain the `auto_select` and `itp_support` options.
The session that `createIdTokenSession` returns is an ordinary Appwrite session. Appwrite first looks for an existing Google [identity](/docs/products/auth/identities) for the Google account in the token. If there is none, it looks for a user with the same verified email and adds a Google identity to that user. If neither exists, Appwrite creates a user and a Google identity.
**Session cookies**
Appwrite stores the session in a cookie on the API domain. If your site and your Appwrite endpoint are on different domains, some browsers block that cookie. In that case, Appwrite also returns the session in a response header. The Web SDK saves it in the browser's `localStorage` and sends it back with each request. Use a [custom domain](/docs/products/network/custom-domains#third-party-cookies) for your Appwrite endpoint to keep the session in a cookie on your own domain.
# Skip the prompt for signed-in users
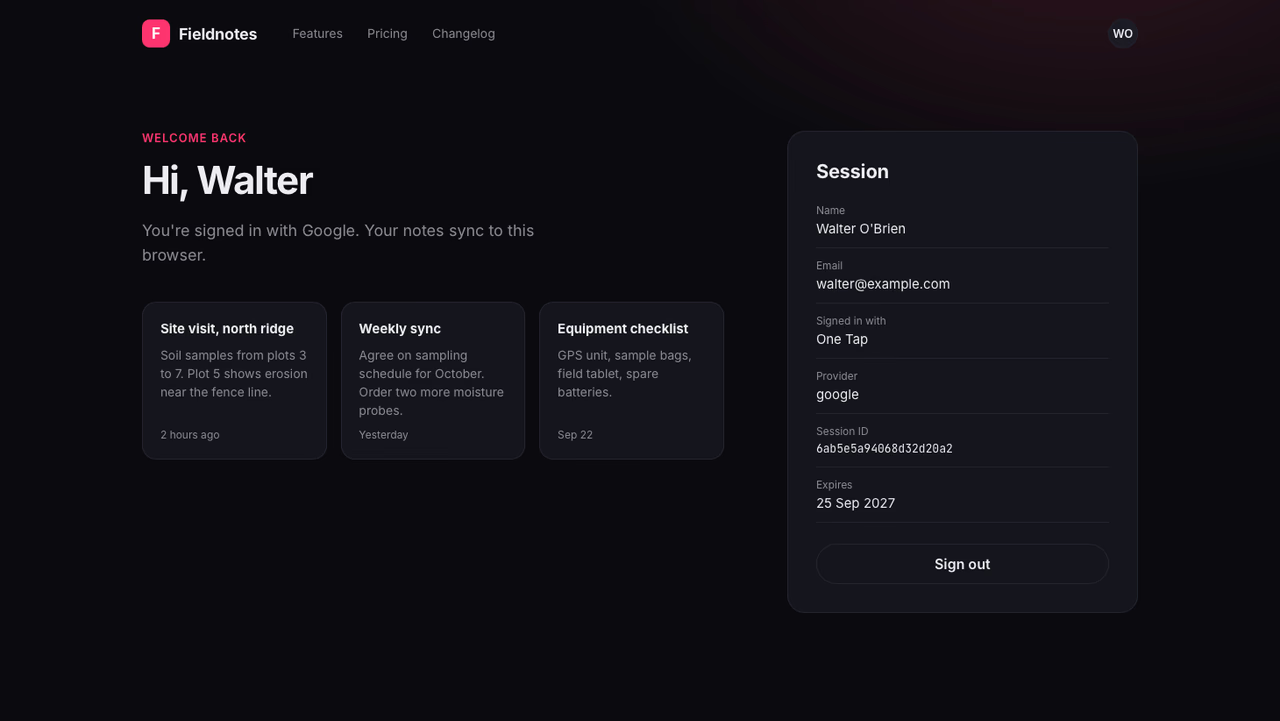
In place of the `whenGoogleReady(startOneTap)` line, call `account.get()` first when the page loads. If it returns a user, the user already has a session, so show the signed-in view. Call `whenGoogleReady(startOneTap)` only when `account.get()` fails, so that One Tap still waits for the Google script.
With `auto_select: true`, returning users can also sign in without a click. If the user approved your site before and only one Google account is signed in, Google returns the ID token when the page loads. Chrome shows the prompt for a few seconds, and the user can cancel the sign-in from it.
When the user signs out, delete the Appwrite session and call `google.accounts.id.disableAutoSelect()`. Without this call, `auto_select` signs the user in again on the next page load. After sign-out, show the signed-out view and call `whenGoogleReady(startOneTap)` again, so that the prompt comes back.
# Browsers show the prompt in different ways
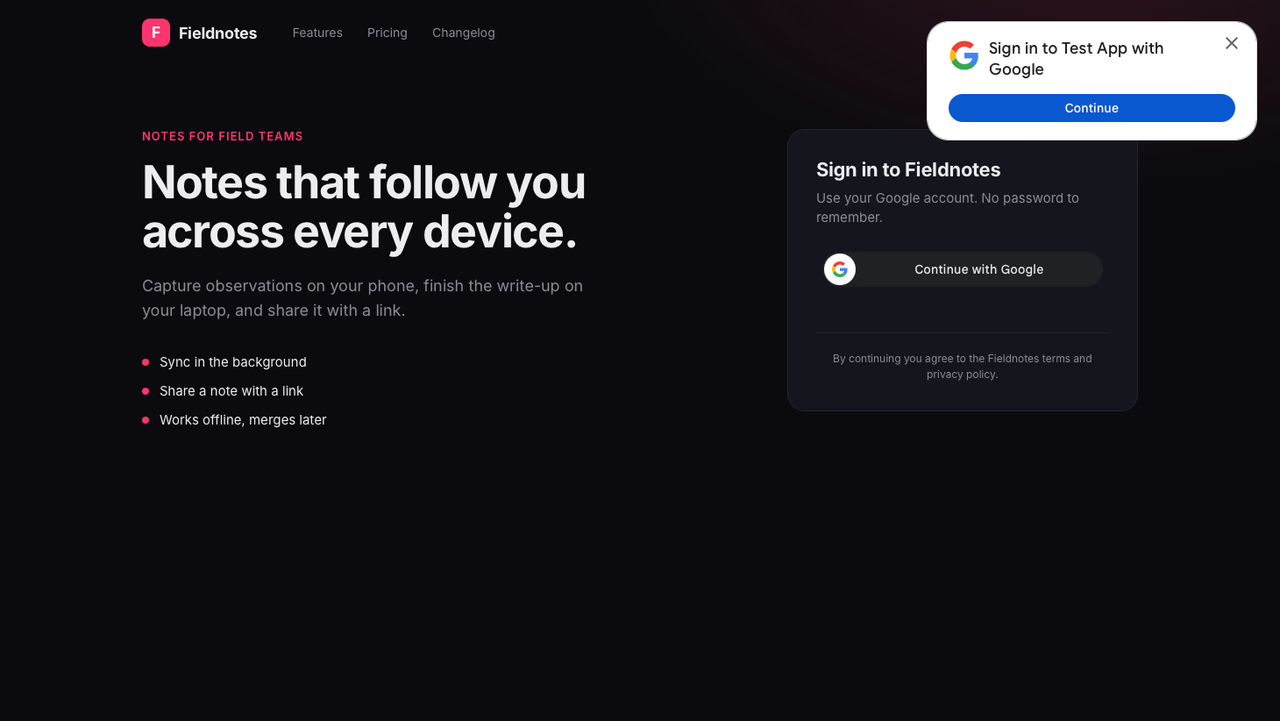
The following table compares the prompt in three browsers on macOS.
| Browser | Prompt | Who draws the prompt |
| --- | --- | --- |
| Chrome | "Sign in to _your domain_ with google.com", with a list of accounts | The browser, natively |
| Arc | The same prompt as Chrome | The browser, natively |
| Safari | "Sign in to _your app name_ with Google", with a **Continue** button | Google's script, inside the page |
In Safari, the user selects **Continue**, and Google opens a pop-up window where the user picks the account. Set `itp_support: true` in `initialize` to show this version of the prompt in Safari. The Safari prompt shows the app name from the **Branding** page in Google Auth Platform, not your domain.
In every browser, the callback receives a Google ID token, so the Appwrite code does not change. Google's list of [supported browsers](https://developers.google.com/identity/gsi/web/guides/supported-browsers) also includes Edge and Firefox, except Firefox on iOS.
The prompt does not always appear. If no Google account is signed in to the browser, the prompt has no accounts to show. If the user closed the prompt before, the prompt stays hidden for a cooldown period. The cooldown can also hide the prompt from you during development. To reset it in Chrome, select the site information icon at the left end of the address bar, which is a circled **i** on `localhost` and two sliders on HTTPS sites. Then select **Reset permission**.
# Add a Sign in with Google button next to the prompt
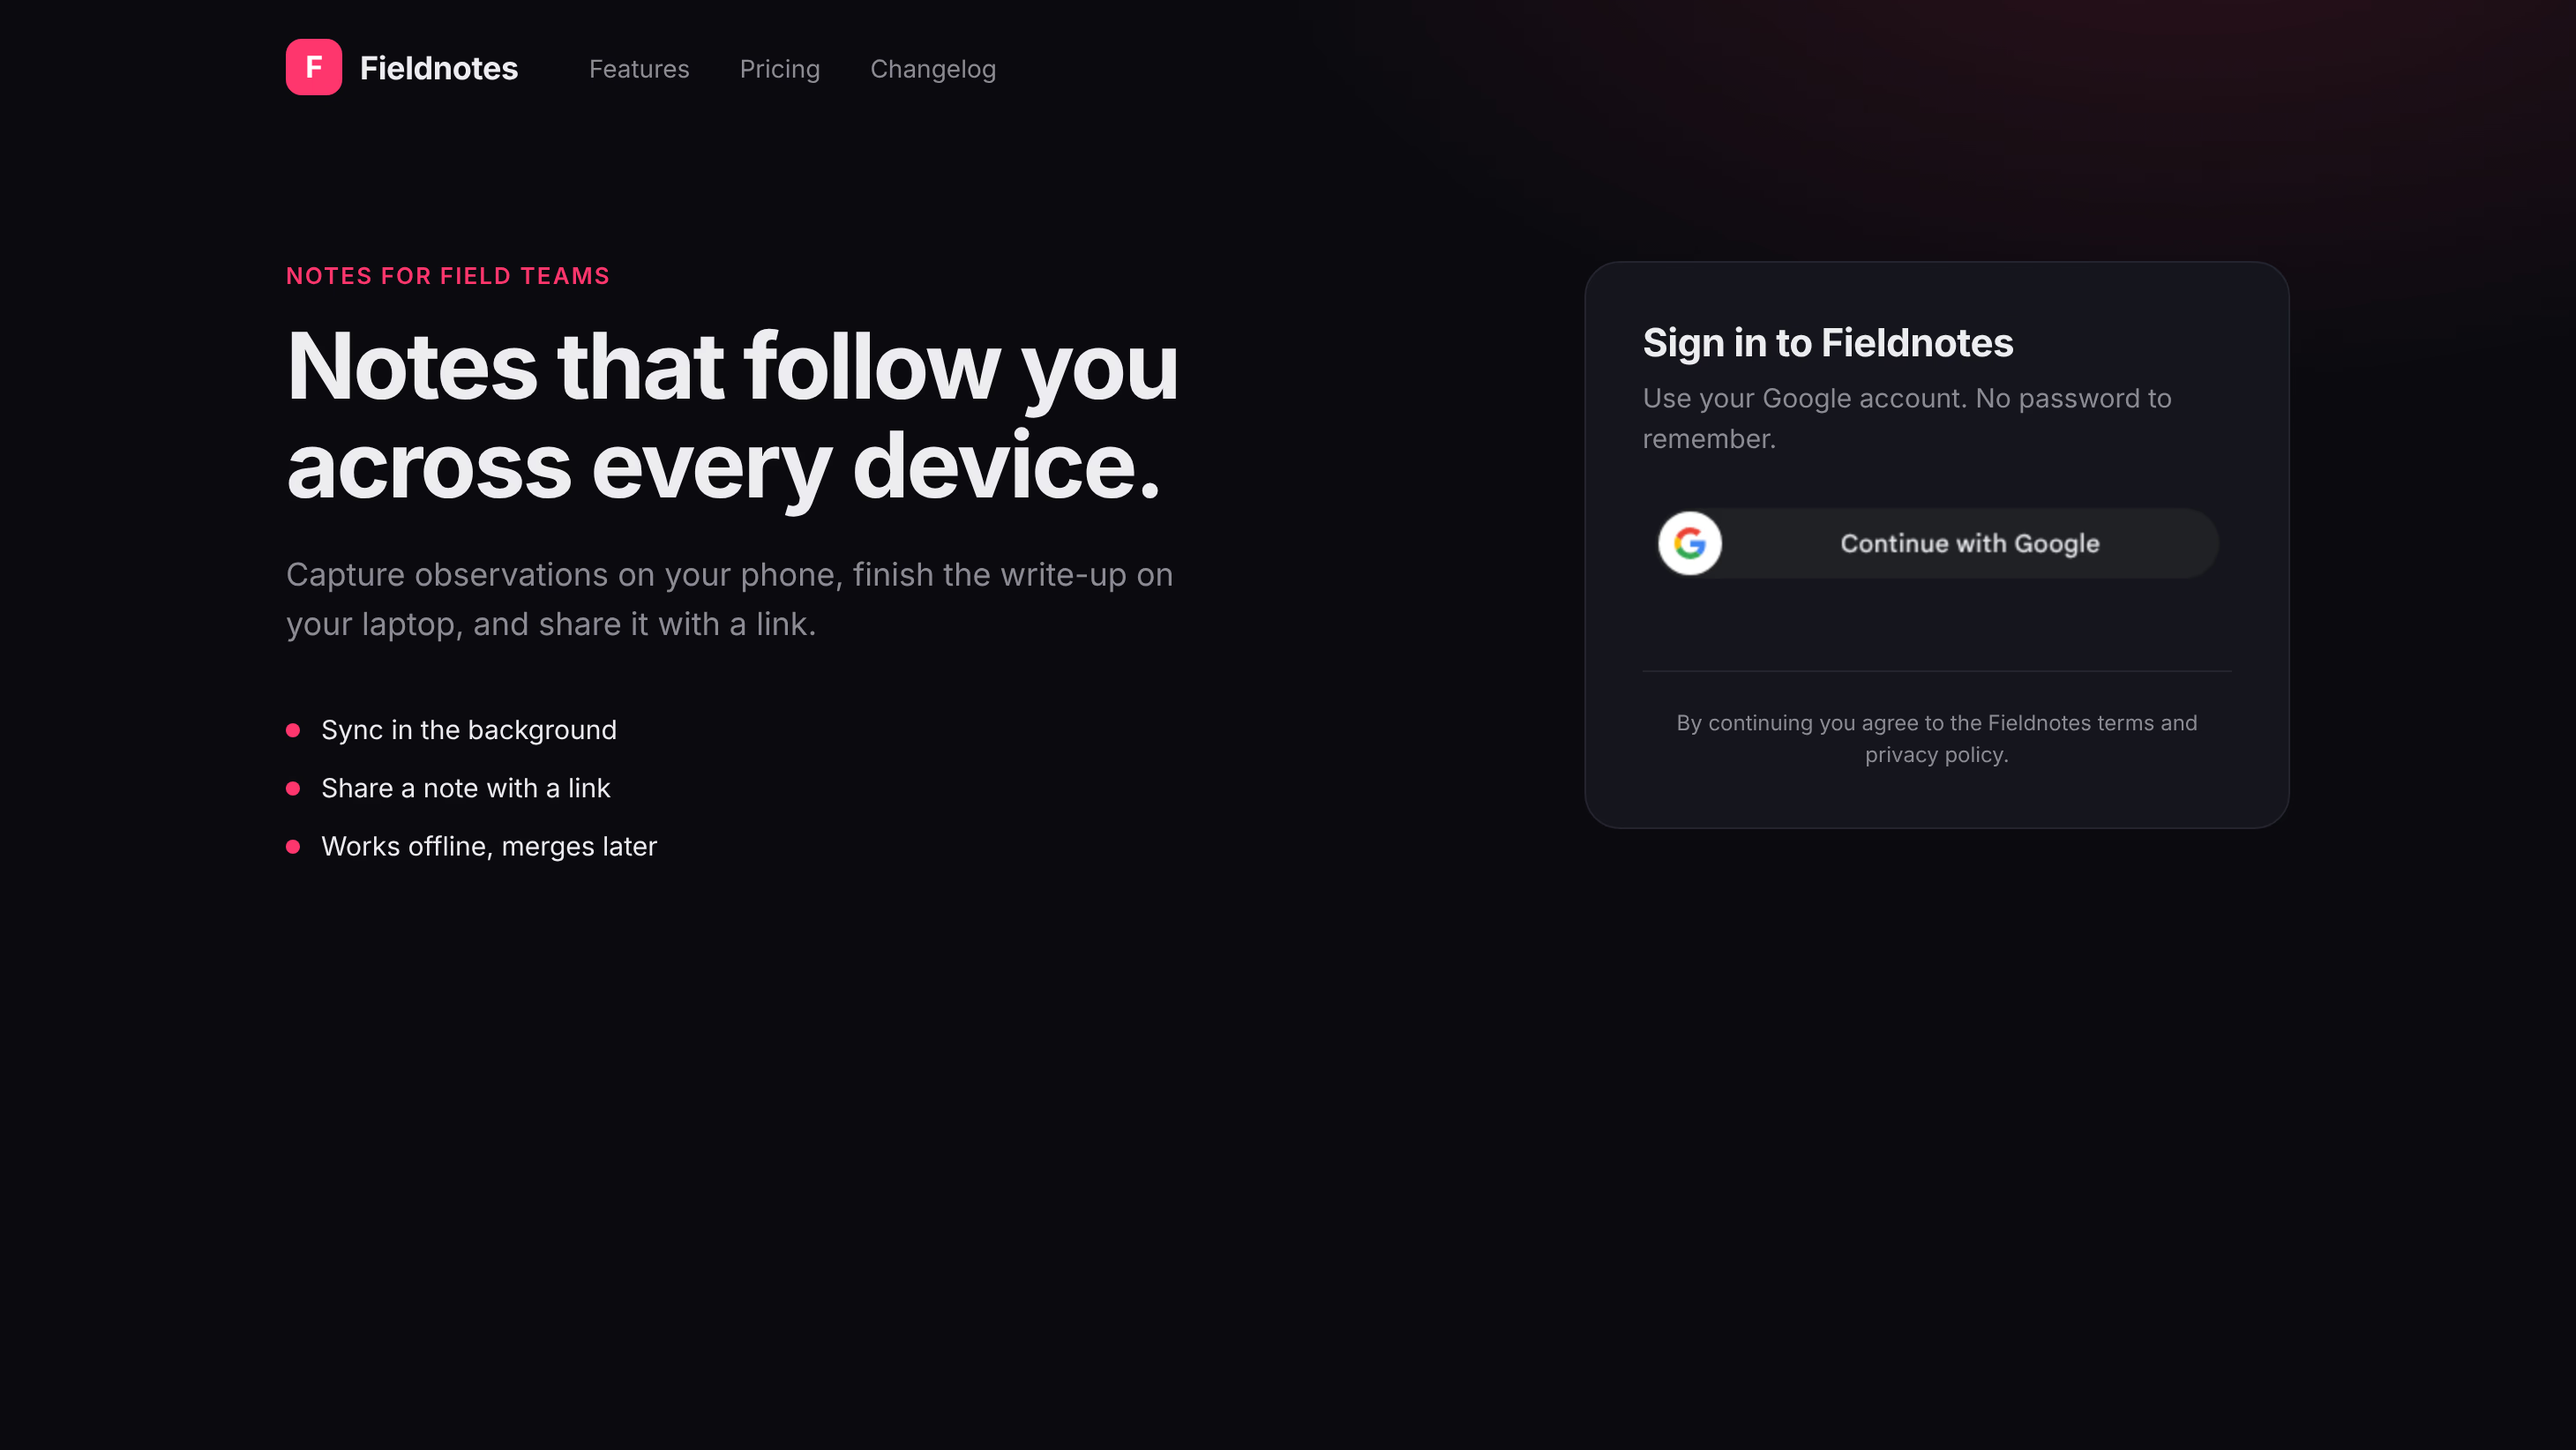
If the site only shows the prompt, a user whose browser hides it cannot sign in. Add the Sign in with Google button to the same page. The button uses the same `initialize` call, so the same callback handles its token.
Add a container to the page:
```html
```
Then call `renderButton` in `startOneTap`, after `initialize`:
```js
google.accounts.id.renderButton(document.getElementById('google-button'), {
theme: 'filled_black',
size: 'large',
text: 'continue_with',
shape: 'pill',
});
```
In Chrome, the button shows the name and email of a signed-in Google account, such as "Continue as Walter". In Safari, it shows **Continue with Google** and opens a pop-up window.
**Dark pages**
Google draws the button, and the prompt in Safari, inside iframes. If your page sets `color-scheme: dark`, the browser paints a white box behind these iframes. To remove the box, set the iframes back to a light color scheme.
```css
iframe[src^="https://accounts.google.com/"] {
color-scheme: light;
}
```
# One web client ID covers Android and the web
A Google ID token from the site and a Google ID token from the Android app go through the same Appwrite call. A user who signs in with one Google account on Android and then on the site gets one Appwrite account. Appwrite finds the existing Google identity.
If your Android app already uses native sign-in, One Tap needs three additions: an origin in Google Cloud, a web app in your Appwrite project, and the JavaScript in this tutorial. The provider settings in Appwrite stay the same.
# Resources
- [Native sign-in](/docs/products/auth/native-sign-in)
- [OAuth2 login](/docs/products/auth/oauth2)
- [Identities](/docs/products/auth/identities)
- [Join the Appwrite Discord](https://appwrite.io/discord)